
LED Headlight Upgrade in Carrollwood: Bulbs and Kits
Flickering LED headlights usually call for checking the bulb and its installation, not immediately switching to a brighter option. For a LED headlight upgrade in Carrollwood, the right choice depends on matching the bulb to your vehicle and making sure the beam works as intended.
New headlights that flicker or fail to provide consistent light can be frustrating. This guide covers how to identify compatible headlight and fog-light bulbs, compare a bulb replacement with a conversion kit, and spot common causes of flickering. It also explains what to consider about installation and legality in Carrollwood before you change your vehicle’s lighting.
Key Takeaways
- Identify the correct bulb base before choosing an LED replacement; the fit matters as much as the light’s appearance.
- Learn why flickering can point to an installation or compatibility issue, rather than a need for a brighter bulb.
- Compare conversion-kit installation with plug-and-play options to understand what each approach involves.
- Consider beam aim and applicable requirements before using upgraded headlights on Carrollwood roads.
- Explore how headlight and fog light choices differ, so you can select lighting suited to your vehicle and driving needs.
Are LED Headlights Legal?
For an LED headlight upgrade in Carrollwood, legality depends on the vehicle’s lighting setup and applicable rules. Automotive shops that install LED vehicle lighting are a local option, but the bulb itself doesn’t establish whether the complete setup complies. Warranty terms also vary by bulb and installer, so distinguish product coverage from installation workmanship.
Factory Housing Fit
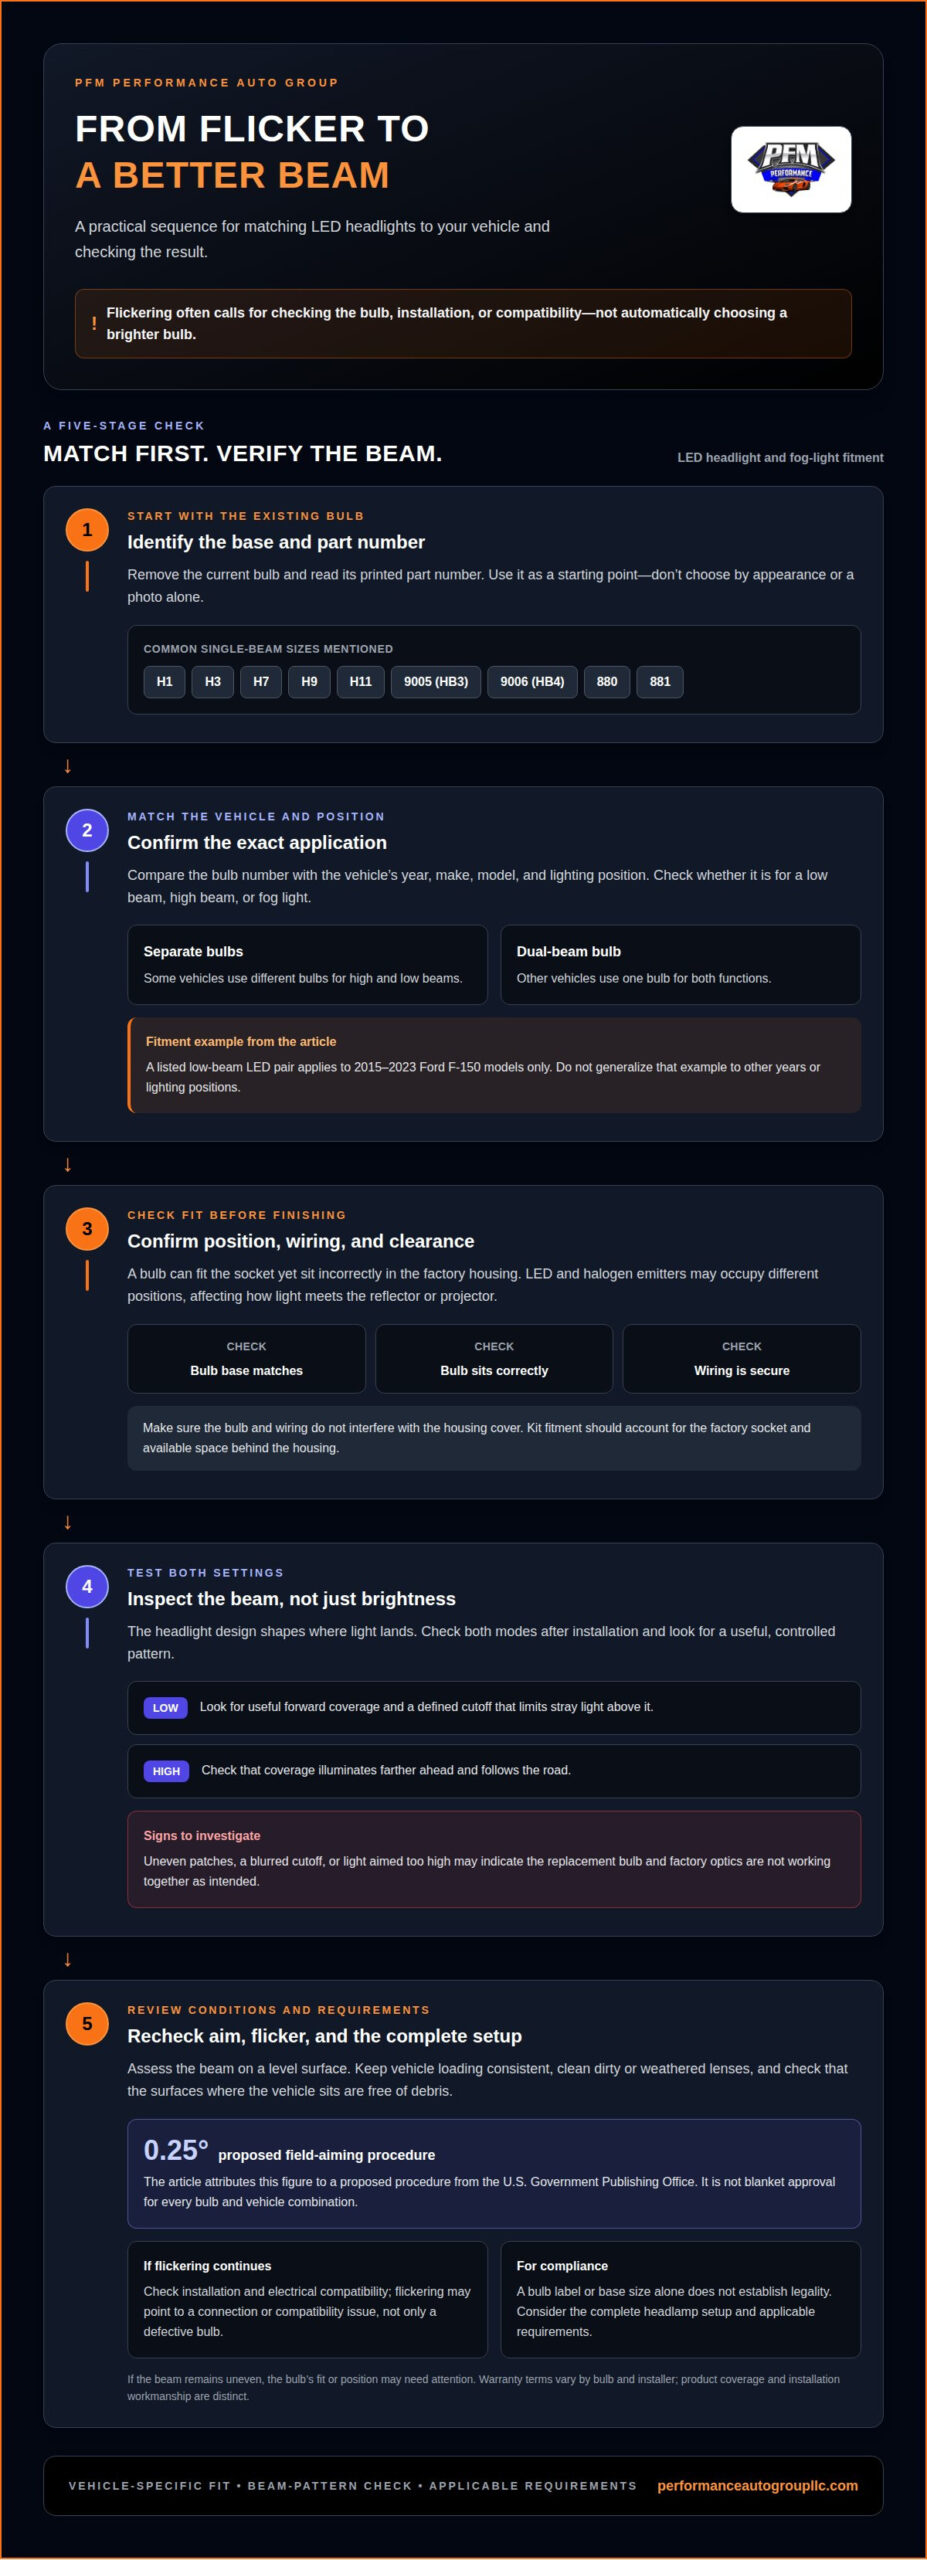
A bulb that fits the socket may still position its light source incorrectly inside the factory housing. Halogen and LED bulbs can differ in emitter position, so physical fit alone does not guarantee a useful beam pattern. Match the bulb base to the housing and check how the light sits relative to the reflector or projector. Make sure the bulb and wiring are secure and do not interfere with the housing cover.
Beam Patterns and Coverage
The headlight’s design shapes the beam, directing light onto the road rather than simply making the lamp look brighter. A low beam should provide useful forward coverage while limiting stray light above its cutoff. A high beam serves a different purpose, illuminating farther ahead. Test both settings after installation and look for uneven patches, a blurred cutoff, or light aimed too high. These signs may mean the replacement bulb and factory optics are not working together as intended.
Bulb Sizes and Beam Types
Common single-beam bulb sizes include H1, H3, H7, H9, H11, 9005 (HB3), 9006 (HB4), 880, and 881. The correct base depends on the vehicle’s application, not appearance alone. Some vehicles use separate bulbs for high and low beams; others use dual-beam bulbs for both functions. Match the replacement to the original bulb type and headlight’s intended beam. A familiar size can still be wrong for a particular housing or beam arrangement.
Legality isn’t settled by a bulb’s label or base size. Drivers planning an LED headlight upgrade in Carrollwood should consider the complete headlamp setup and check applicable requirements with local authorities. Beam aim matters because a poorly directed cutoff can affect visibility for the driver and others. The proposed field-aiming procedure was to place the headlamp cutoff within 0.25 degree, according to the U.S. Government Publishing Office. That figure describes a proposed procedure, not blanket approval for every bulb and vehicle combination.
After an upgrade, assess the beam on a level surface and inspect both settings. Look for a defined low-beam cutoff, even output from side to side, and high-beam coverage that follows the road ahead. Dirty or weathered lenses, vehicle loading, and debris on the surfaces where the vehicle sits can affect aim or beam quality. Clean the lenses and keep the vehicle’s load consistent during an aiming check. If the pattern remains uneven, the bulb’s fit or position may need attention.
Need Help Finding LED Headlight Bulbs for Your Vehicle?
Start by identifying the exact bulb base, then match a replacement to your vehicle’s headlight application. The right fit helps maintain useful road lighting and avoids choosing by appearance alone.
Bulb Base and Size Lookup
To identify the base, remove the existing bulb and read the part number printed on it. Use that number as a starting point when matching an LED replacement. Compare it with your vehicle’s year, make, model, and lighting position, since one vehicle may use different bulbs for headlights and fog lights. Don’t rely on a bulb’s appearance in a photo.
Vehicle-Specific LED Kits
A vehicle-specific LED kit is selected for a particular vehicle and lighting position, rather than treated as a universal fit. Match the kit details to the vehicle’s year, make, model, and whether it is for a low beam, high beam, or fog light. Fitment information should also account for the factory socket and the space behind the housing, where the wiring and bulb assembly must sit.
Bulb Fit for Cars and Trucks
There isn’t one bulb that fits every popular car or truck. For example, a listed low-beam LED pair applies to 2015-2023 Ford F-150 models; that example shouldn’t be generalized to other years or headlight positions. Check the vehicle-specific application and compare it with the existing bulb number. A sedan and a pickup can require different bases, even when both use LED lights.
Reliability of Brands and Kits
No single brand or kit is automatically the most reliable choice for every vehicle. Prioritize an accurate application match, clear product identification, and compatibility with the factory electrical connection. A kit that fits the socket but sits incorrectly may compromise the beam. Consider fitment and installation design alongside brand familiarity, rather than assuming a higher brightness claim means better visibility.
Fit affects more than whether a bulb turns on. Headlight aim and beam quality help you see the road clearly, while fog lights serve a separate lighting position. A mismatched bulb can sit at the wrong depth or angle, changing where the light lands. Confirm the base and application before installation, then assess the lights in both high- and low-beam modes. Electrical compatibility matters too: flickering after installation may point to a connection or compatibility issue, not just a defective bulb.
Use the vehicle’s bulb number as the first reference, then compare the kit’s stated vehicle application and lighting position. If the number is unreadable, the vehicle’s year, make, model, and headlight function narrow the lookup. Accurate matching can significantly reduce guesswork, but bulb fit alone doesn’t establish correct beam performance. For help narrowing the options, schedule a bulb fitment appointment.
LED conversion kit installation
A conversion kit changes more than the light source: its components and fit must suit the vehicle. After installation, carefully check that everything functions as intended.
A typical LED or HID conversion-kit installation is listed as taking 20 to 30 minutes, though the vehicle layout and kit design affect the work. A clean installation begins by confirming the bulb base, comparing the kit components with the factory connections, and following the kit instructions. The finished setup needs a function check and a beam inspection, not just a quick switch-on.
Conversion Kit Components
An LED conversion kit pairs replacement headlight bulbs with the parts needed for its electrical connection. HID conversion kits use bulbs and ballasts, with 35-watt and 55-watt ballasts listed as typical options. The ballast supports the HID system; it isn’t an LED component. Before installation, identify the kit type and match each connector and bulb base to the vehicle’s existing setup.
Sealed-beam conversion kits are intended for vehicles using a sealed-beam headlamp assembly. They replace the complete lamp unit rather than only changing a removable bulb, so the assembly’s fit and connection matter. For an H7 application, a mini LED conversion kit is sold as a pair of two bulbs. Confirm the vehicle uses H7 bulbs before selecting that format; a two-bulb package doesn’t establish compatibility by itself.
Follow a clear sequence during installation: identify the lighting application, remove the existing bulb or sealed-beam unit, and fit the matching kit components. Secure the wiring and reconnect the vehicle’s electrical connection according to the instructions. Test the lights, switching between low and high beams where applicable. If a light flickers or does not illuminate consistently, check the connection and make sure the components are seated correctly.
Conversion Kit Cost
The cost of a conversion kit depends on the vehicle application, kit type, included components, and installation needs. LED bulb kits and HID systems use different components, while a sealed-beam conversion replaces an entire lamp assembly. The price depends on the case and is provided after a quote request. Comparing kit contents and fitment helps clarify what the quoted work includes.
Visibility depends on correct installation as well as the kit choice. After fitting, inspect whether each headlight operates steadily, whether the high- and low-beam switch functions properly, and whether the beam remains consistent. Follow the kit instructions for its specific components; don’t treat LED and HID installation as interchangeable. For a vehicle-specific installation, schedule an installation appointment.
Plug-and-play installation
“Plug-and-play” describes a replacement designed to connect to a vehicle’s existing headlight connection. Before installation, compare the bulb base and connector with the vehicle’s application.
Plug-and-Play Compatibility
A plug-and-play LED replacement can simplify installation when its base and connector match the vehicle. However, “plug-and-play” does not mean every LED bulb fits every automotive socket. Confirm the headlight position and bulb application first, then compare the replacement’s connection with the original. A bulb that seats improperly or leaves wiring difficult to position is not a straightforward fit, even if its base looks similar.
During installation, use the existing halogen bulb as a reference. Note how it sits in the housing and how its connector is oriented before removing it. Fit the LED replacement without forcing the connection, then secure the assembly as instructed. Operate the lights and switch between available beam settings. This helps reveal a poor connection or incorrect seating before you drive.
Brightness alone does not establish compatibility. A white LED may look different from a halogen bulb, but the replacement still needs to work correctly with the vehicle’s headlight design. After installation, check for steady operation and a consistent beam. If the light flickers or fails to turn on, inspect the connection and confirm the bulb matches the application. A change in color does not prove improved visibility.
Installation Time
A listed LED headlight installation time is 30 minutes, while an HID headlight installation time is 60 minutes. HID headlights are listed as warming up within seconds. These are distinct reference times for LED and HID installation, not a promise that every vehicle follows the same process. Housing access, kit components, and the vehicle’s connection determine the work involved.
For a plug-and-play replacement, the key steps are consistent: confirm the application, remove the existing bulb, connect the replacement, and test the lights. The listed installation time may be shorter for an LED setup than for an HID setup, but the final check still matters. Confirm that low and high beams operate as intended, then observe the beam against a suitable surface before driving at night.
Keep the kit instructions handy throughout installation. They explain the correct connection and seating for that specific replacement, which can differ between LED and HID systems. After installation, test each headlight separately and then together. Look for flickering, an unlit bulb, or an uneven beam. Address these signs before regular driving instead of relying on appearance alone.
LED headlight and fog light bulb selection
Choose an LED bulb by matching its base, lighting position, and beam function to your vehicle. Then compare its output and color with the conditions you regularly encounter.
Start with your vehicle’s bulb application, not the brightest specification on a package. Headlight and fog-light positions serve different purposes, so a bulb suited to one may not suit the other. Cool white is a common headlight preference, while yellow or amber is a common fog-light choice in inclement weather. Color alone, however, does not establish a correct fit or beam.
Compare lumen ratings as one selection detail, rather than treating them as a complete measure of visibility. Example LED sets include an H11 bulb set rated at 6,000 lumens and 50 watts, with a 6500 K color temperature. A dual-beam H4 set is rated at 5,000 lumens and 40 watts. These examples show why the bulb base and beam type must match the vehicle’s application.
Other examples illustrate the range: an H13 dual-beam set is rated at 10,000 lumens and 90 watts, while an H3 pair is rated at 4,000 lumens and 34 watts. A dual-color H11 set is rated at 5,200 lumens and 28 watts. These figures describe different bulb sets, not a guarantee of equal road illumination. The headlight housing and beam aim affect where light lands.
Traditional halogen bulbs typically produce around 1200-1500 lumens, while listed LED headlight bulbs have a lifespan of 50,000 hours. Halogen alternatives are listed at 400-1,000 hours. Treat lifespan and brightness as comparison points, then consider fit, beam function, and the vehicle’s headlight design together. A higher lumen figure alone doesn’t show whether the light is directed usefully.
LED light bars are separate auxiliary lights, not direct replacements for headlight or fog-light bulbs. Keep your choice tied to the vehicle’s intended lighting position: select a replacement bulb for a compatible factory socket, and treat a light bar as a separate lighting component. For a bulb, identify the base and beam type before comparing color or output.
For a tailored selection of LED headlight and fog-light bulbs, visit PFM Performance Auto Group to find the right options for your vehicle.
The section lists H11, H4 dual-beam, H13 dual-beam, and H3 LED bulb sets as examples. Which fits a particular car or truck depends on its bulb base, lighting position, and beam function.
PFM Performance Auto Group
PFM Performance Auto Group serves drivers in Carrollwood and Hillsborough County with vehicle enhancement services, including HID and LED lighting installation. If your project also includes window tint, options include Auto Window Tinting and Black Pearl Nano Ceramic Window Tint By Madico. Tinting and headlight selection are separate decisions, so focus on the change you want for your vehicle.
To discuss your vehicle enhancement plans, describe your vehicle and the upgrade you have in mind. PFM Performance Auto Group can help you explore its automotive lighting and window tinting services. Contact the shop to discuss your needs.
Choose the Next Step for Your Driving Needs
A lighting upgrade should support how you use your vehicle, not just change how the headlights look. If you’re planning an LED headlight upgrade in Carrollwood, focus on dependable performance for your regular driving, a suitable bulb, and a careful installation. Extremely dark tints might slightly reduce nighttime visibility. If the lighting result still does not meet your needs, a vehicle-specific review can help identify whether the bulb, installation, or headlight setup needs attention.
PFM Performance Auto Group offers Car LEDs Bulbs and HID and LED lighting installation for drivers in Hillsborough County. The business also offers Auto Window Tinting, Commercial Window Tinting, and Home Window Tinting for separate tinting projects. Choose the service that fits your plans and take time to make a decision that suits your vehicle.
A careful choice can make your next drive feel more considered. Move forward with clarity.
Frequently Asked Questions
How Can You Fit LED or HID lights?
Install an LED or HID kit only after matching it to the vehicle’s lighting system. With the vehicle off, identify the existing bulb and connector, then follow the instructions for that specific kit. LED and HID kits are not interchangeable: HID systems use ballasts, while LED kits use their own connection components. If the connectors do not match or the bulb will not seat properly, stop rather than forcing the fit.
How Long Do LED Headlights Last?
LED headlight lifespan is listed at 50,000 hours, while halogen alternatives are listed at 400-1,000 hours. Treat those figures as general lifespan comparisons, not a guarantee for a specific bulb or vehicle. Heat, operating conditions, and the installation can affect how an individual light performs. If one bulb dims, flickers, or stops working, inspect its connection and the headlight system rather than assuming both bulbs need replacement.
Verdict: HID Headlights or LED Headlights?
Choose LED or HID based on the vehicle’s compatible system and your priorities. LED headlights are listed with a 50,000-hour lifespan; HID headlight lifespan can vary depending on the bulb and operating conditions. HID systems also require a ballast, while LED kits use different components. Those differences can guide your choice, but neither technology is automatically the right fit for every housing. Match the system to the vehicle and check the finished beam.
What Color Automotive LED Bulb Should I Use for My Vehicle?
Cool white is a common headlight preference, while yellow or amber is a common fog-light choice in inclement weather. Choose based on lighting position and driving conditions, not color alone. A white LED headlight bulb still needs to match the vehicle’s application, and fog lights need their own compatible bulb. After choosing a color, assess the beam coverage and check applicable requirements before using the lights on public roads.
How much does LED headlight installation cost in Carrollwood?
Installation cost depends on the vehicle, bulb application, kit components, and work involved. A straightforward bulb replacement and a conversion requiring additional components aren’t the same job. For a specific quote, provide the vehicle’s year, make, model, and the headlight position you want to change. These details help define the installation being priced. A general online range can’t account for the parts and fitment needs of your vehicle.
Are LED headlight conversions street legal in Florida?
Do not assume every LED conversion is street legal simply because the bulb fits. The headlamp housing, bulb application, and resulting beam all matter when assessing a conversion. Tint legality varies by state or country, and it is not legal everywhere. Check the requirements that apply to your vehicle in Florida, and make sure the lights are aimed correctly. A poorly directed beam may cause glare or reduce useful road illumination, even if the bulbs turn on.
Do LED replacement bulbs work with factory halogen headlight housings?
Some LED replacement bulbs are designed for halogen applications, but a matching socket alone does not ensure suitable operation. The LED’s position inside the factory housing affects how the reflector or projector directs light. After installation, assess the beam for a clear cutoff and even coverage. If the result is scattered or poorly aimed, the replacement may not work well with that housing, even when the connector appears to fit.
How bright are LED headlights compared with halogen and HID bulbs?
Brightness varies by bulb and application, so compare specific specifications rather than assuming every LED is brighter. Traditional halogen bulbs typically produce around 1200-1500 lumens. For comparison, a listed H11 LED set is rated at 6,000 lumens, while an H4 dual-beam set is rated at 5,000 lumens. Output figures don’t show beam quality by themselves; housing design and aim affect how much useful light reaches the road.