
Factory Radio Replacement With Navigation for Your Vehicle
Choosing a navigation radio is only part of the job; the cables and adapters matter just as much. When you replace a factory radio with navigation, compatibility depends on your vehicle and the connections needed to integrate the new unit. Included accessories vary, so understanding the installation requirements helps you choose a setup that fits.
It’s reasonable to want a clear answer before changing a system built into your vehicle. This guide explains how to identify a compatible radio, which cables and accessories may be needed, and how antenna placement and plug-and-play connections affect installation. You’ll also see why details such as wiring and dash components matter for a replacement that fits and functions correctly.
A careful plan makes the upgrade more straightforward, from choosing a compatible unit to checking the final connections. Here’s what to know before selecting a navigation radio for your vehicle.
Key Takeaways
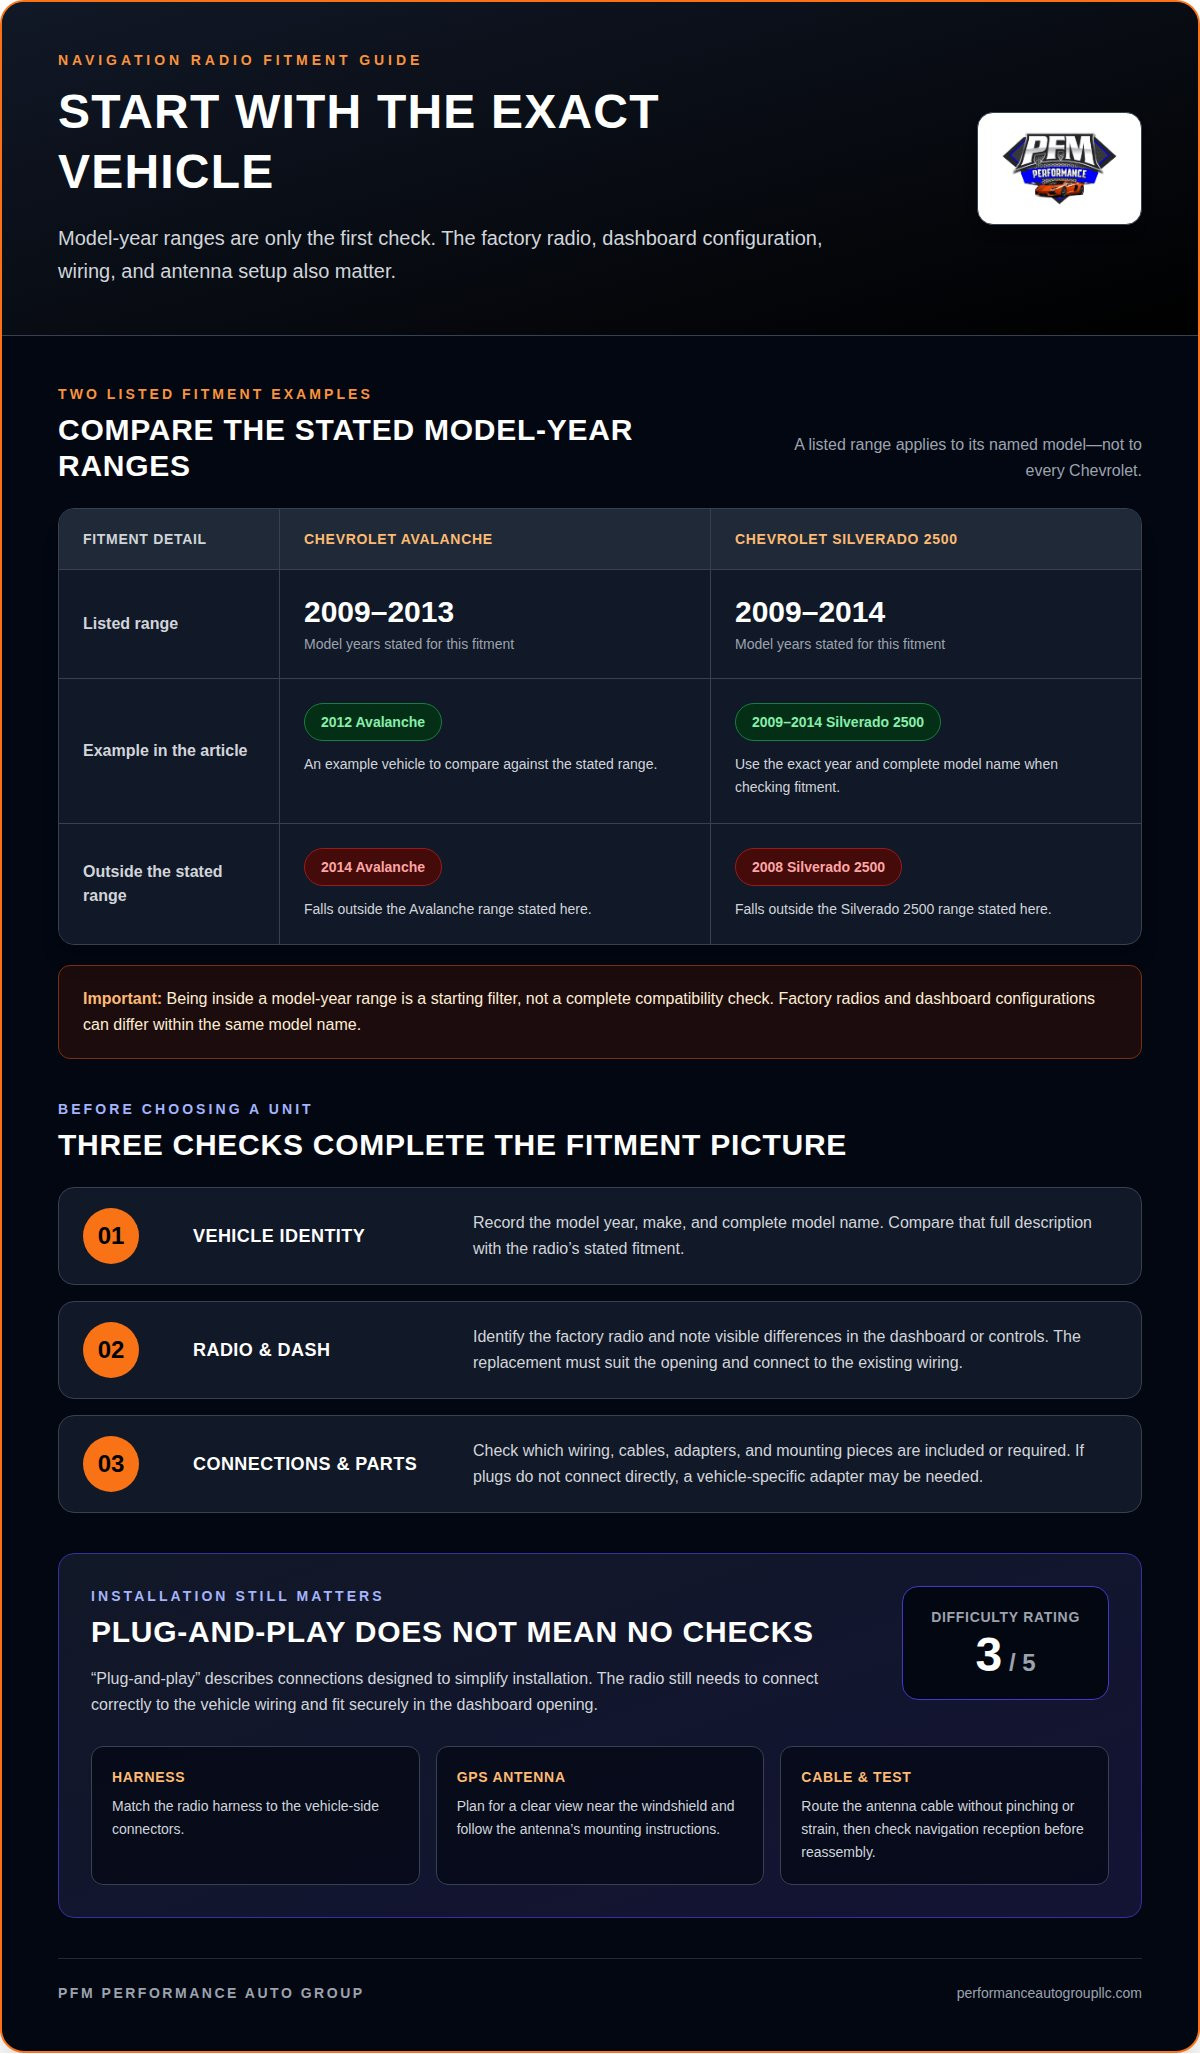
- Start with your vehicle’s year, make, and model: listed fitments include 2009-2013 Chevrolet Avalanche and 2009-2014 Chevrolet Silverado 2500.
- Plan for the cables, adapters, and dash components that connect the replacement radio to your vehicle.
- GPS antenna placement is part of the installation, and its position can affect navigation signal reception.
- Plug-and-play installation is rated 3 out of 5 for difficulty, so the vehicle’s connections and setup still matter.
- Vehicle-specific replacement stereos may be programmed using the vehicle’s 17-digit VIN.
Which radio will fit my vehicle?
Start with the vehicle’s year, make, and model. A radio listed for one Chevrolet model may not fit another, even when both belong to the same model family. Fitment also depends on the factory radio and dashboard configuration. Use the full vehicle description as your starting point, not just the brand or screen size.
Model-year ranges give a useful first filter. A navigation radio is listed for 2009-2013 Chevrolet Avalanche models, while another fitment covers 2009-2014 Chevrolet Silverado 2500 models. Those ranges are specific to each named model. A 2014 Avalanche or a 2008 Silverado 2500 falls outside the corresponding range stated here.
Use these steps to narrow down the match before selecting a unit:
- Record the model year, make, and complete model name, such as 2012 Chevrolet Avalanche.
- Compare that vehicle description with the radio’s stated fitment range.
- Identify the factory radio and note visible differences in the dash or controls.
- Review the installation requirements for the wiring, mounting pieces, and vehicle functions involved.
That last step matters because the same year and model can have different factory configurations. Vehicles with the same model name may come with different original radios or dashboard controls. The replacement must suit the opening and connect to the existing wiring. A radio that fits physically but leaves a needed function disconnected is not a complete match.
For example, the 2009-2013 Chevrolet Avalanche range does not mean every radio advertised for an Avalanche fits every model year. Match the exact year first, then examine the original radio and required connections. Apply the same careful sequence to a 2009-2014 Chevrolet Silverado 2500. Model names alone are not enough to establish compatibility.
Navigation adds another fitment consideration: the installation needs a suitable place for the GPS antenna and a route for its cable. Consider the radio and its accessories together, rather than choosing a screen first and sorting out connections later. Check what the package includes and which vehicle-specific cables or adapters the installation requires.
A sound fitment decision combines three checks: exact year-and-model compatibility, a match for the dashboard and factory radio, and suitable connections. If you’re planning to replace a factory radio with navigation, use these checks to identify the right unit before installation. They provide a solid starting point for wiring and antenna placement.
GPS antenna placement and signal
A navigation radio needs a GPS antenna positioned to receive satellite signals. Because placement affects reception, include it in the installation plan from the start. The dashboard, windshield area, and surrounding materials can all affect where the antenna should sit. Follow the antenna manufacturer’s instructions for orientation and mounting.
Start by looking for a location with a clear view through the windshield. The upper dashboard is often considered because it keeps the antenna inside the cabin and near the glass. The best position depends on the vehicle’s dashboard and the specific antenna. A deep recess, covered compartment, or spot behind obstructive material can interfere with reception.
Before securing the antenna, an installer can assess possible positions and route its cable to the radio. The cable should reach without being stretched, pinched, or trapped behind a trim panel. For example, routing it over a sharp edge could damage it when the dashboard is reassembled. A tidy route protects the connection and keeps loose wiring out of sight.
Placement decisions should account for several details:
- Clear reception: Keep the antenna near a windshield area with an open view of the sky.
- Dashboard materials: Avoid placing it beneath or behind materials that may obstruct satellite reception.
- Cable path: Route the lead without tight bends, pinching, or strain at the connector.
- Secure mounting: Use the mounting method specified for that antenna, rather than leaving it loose.
- Final testing: Check navigation reception after installation and before completing the reassembly.
Testing is important because a position that looks suitable may perform differently in a particular vehicle. After connecting the antenna, allow the navigation unit to acquire its position in an open area. If reception is weak or the location takes too long to update, check the antenna position and cable connection. Adjusting one at a time helps identify whether placement or a loose connection is affecting reception.
For example, if the antenna is beneath a metal obstruction, moving it to an unobstructed area near the windshield may improve reception. Make adjustments methodically: change the position, then test again, rather than moving several components at once. Once reception is stable, secure the antenna and finish routing the cable without disturbing its connection.
A precise installation balances signal access with a clean, protected cable route. If you’d like help planning the antenna position and radio installation, book an installation appointment.
Plug-and-play installation
“Plug-and-play” describes connections designed to simplify installation, not a promise that every vehicle needs no adaptation. A compatible radio still has to connect correctly with the vehicle’s wiring and fit securely in its dashboard opening. The installation difficulty is rated 3 out of 5, so careful preparation and testing remain important.
The installer starts by matching the radio harness to the vehicle-side connectors. A harness is a group of wires and plugs that carries power and signals between components. If the plugs don’t connect directly, a vehicle-specific adapter may be needed. The right connection depends on the radio and vehicle configuration, not simply on a “plug-and-play” label.
Before installation, organize the work around the parts and connections required for the setup:
- Radio harness: Match its connector and wiring to the replacement unit.
- Vehicle adapter: Include one when the factory plug and radio harness differ.
- Mounting pieces: Use suitable brackets or trim pieces to secure the unit in the dash.
- Accessory leads: Route required connections, such as the GPS antenna cable, without pinching them.
- Factory functions: Test the controls and features affected by the radio change.
Make connections carefully, without forcing plugs together. If two plugs differ, identify the required adapter instead of cutting or altering wires as a shortcut. This keeps connections orderly and makes the installation easier to inspect. Manage cable slack as well: arrange excess wire neatly, and avoid leaving a lead so tight that it strains a connector when the dashboard is reassembled.
Test the system before fully closing the dashboard. The installer should power on the radio, check its basic operation, and confirm that navigation and connected audio functions respond. If a feature fails, inspect the relevant connection while the wiring is accessible. A loose antenna plug, for example, can affect navigation reception even when the screen turns on normally.
Once the connections pass these checks, secure the radio and carefully refit the dash trim. A unit that sits unevenly or leaves a gap may indicate a mounting mismatch rather than an electrical problem. Separating fit from function helps the installer address the right issue instead of treating every problem as a wiring fault.
Plug-and-play can simplify a compatible installation, but the result still depends on the right harness, adapters, mounting pieces, and final tests. A careful process protects the wiring and confirms that the replacement radio works as intended before the vehicle is returned.
Vehicle-specific factory radio replacement stereos
Vehicle-specific stereos are chosen to match a vehicle’s details and original setup, not just its screen size. When choosing between built-in GPS navigation and phone-based directions, consider how you prefer to access navigation while driving.
GPS Navigation Stereo Options
A GPS navigation car stereo uses an antenna to receive positioning signals and provide navigation through the radio unit. Review how the stereo handles navigation, which antenna connections it needs, and whether its dimensions and controls suit your vehicle. Consider whether its navigation functions fit your preferences. A well-matched unit brings the display and radio controls together in one installed system.
Stereo or Phone Navigation
Choose an aftermarket navigation stereo if you want directions displayed through the replacement radio. Phone navigation may suit you better if you prefer an app you already know. The right option depends on your preferred interface and the stereo’s compatibility with your vehicle. Either way, plan a suitable installation and a safe way to use directions.
Vehicle-specific replacement stereos are designed around the fit and connections of particular vehicles. This can help account for differences in dashboard shape, factory wiring, and original controls. A stereo that matches the vehicle is a more considered choice than selecting a unit by appearance alone. Start by checking the exact year, make, and model.
Some vehicle-specific upgrades are programmed using the vehicle’s 17-digit VIN. The VIN helps identify the vehicle configuration for programming the replacement system. The number must correspond to the vehicle being equipped; it is not a substitute for matching the stereo’s physical fit and connections. For a careful selection, programming and installation requirements should be considered together.
Before choosing, compare the following details:
- Vehicle fit: Match the stereo to the exact vehicle description and original dashboard layout.
- Navigation method: Decide whether you want GPS navigation through the stereo or directions through your phone.
- Programming: Determine whether the vehicle-specific upgrade uses the vehicle’s VIN.
- Connections: Account for the required antenna lead, wiring, and any vehicle-specific adapters.
- Controls: Consider how the replacement will work with the controls and functions you use.
For example, a driver who wants navigation on the stereo display may prefer an aftermarket GPS unit. Someone who relies on a phone navigation app may prioritize a system that suits that preference. In either case, the vehicle’s wiring and dashboard determine which replacement can be installed correctly.
Make the decision in sequence: identify the vehicle, choose your navigation approach, then match the stereo and its programming needs. This keeps your desired features aligned with the vehicle’s fit and installation requirements.
Will replacing the factory radio affect vehicle warranty or safety features
Replacing a radio involves changing an electrical component, so review warranty terms and connected vehicle functions before installation. The effect depends on the specific warranty wording and whether the radio work relates to a later problem. The answer can vary by vehicle and reported fault.
Review the vehicle’s written warranty for coverage related to the audio system, wiring, and dashboard electronics. Note any exclusions and the process for reporting a fault. Keep the warranty document and installation records together. If an audio problem appears later, these details help clarify what work was completed and when.
Installation quality matters, too. A mismatched harness, damaged wire, or poorly secured connection can cause an electrical problem. The right adapter and orderly wiring help reduce avoidable strain on factory connectors. Avoid unnecessary wire changes, and keep connections accessible for inspection.
Check safety-related functions separately. Depending on the vehicle, the original radio area may interact with features such as a backup camera, steering-wheel controls, or audible alerts. These functions vary between vehicles. Identify what the factory system currently supports, then test each relevant feature after replacement.
A practical inspection can cover these points:
- Before removal: Record which factory controls and connected functions operate.
- During installation: Match the harness and adapters to the vehicle and replacement radio.
- Before reassembly: Test the radio, navigation, and any connected vehicle functions.
- After installation: Confirm that dashboard controls and relevant alerts still work.
- For records: Keep the work details with the vehicle’s warranty documents.
For example, if the factory screen displays a backup camera, check the image before finishing the installation. If it doesn’t appear, inspect the related connection rather than assuming the camera has failed. Apply the same approach to steering-wheel controls: test their response and check the interface connection if they stop working.
These checks help distinguish a radio issue from a vehicle function that needs attention. They also provide a clear record of how the system worked before and after the change. A navigation upgrade is not complete until you’ve tested its intended features and the vehicle functions affected by the installation.
For a vehicle-specific installation, book a radio installation appointment.
PFM Performance Auto Group
PFM Performance Auto Group helps drivers planning vehicle upgrades consider the whole cabin experience, including comfort and privacy alongside in-dash technology. Its vehicle enhancement services include auto window tinting and Black Pearl Nano Ceramic Window Tint by Madico, with options to suit different preferences.
If a navigation upgrade has you planning other vehicle changes, PFM can help with window tinting as part of a broader refresh. Contact PFM Performance Auto Group to discuss your vehicle enhancement needs.
Make the upgrade fit the way you drive
Choose a setup based on how you want to use navigation, audio, and your vehicle’s existing controls. If you plan to replace your factory radio with navigation, consider the installation as part of your everyday driving experience, not simply a screen change. The right choice should suit your habits and preserve the features you rely on.
PFM Performance Auto Group offers car audio and CarPlay or Android Auto installation for drivers exploring audio and smartphone integration options. Consider how these options fit your navigation preferences, then contact PFM to discuss your vehicle upgrade.
A thoughtful plan helps you move forward with clarity and confidence.
Frequently Asked Questions
Will the radio work with my factory backup camera?
It can work if the replacement radio is compatible with the vehicle’s camera connection. The camera may use a connector or signal format that differs from the new unit, so installation may require an adapter. A screen that powers on, for example, doesn’t prove the camera feed is connected. Test the camera image under its usual operating conditions before fully reassembling the dashboard.
How do I replace a factory radio with a navigation head unit?
Start by selecting a head unit that matches your vehicle and navigation needs. Then identify the connections and mounting components required for that installation. During fitting, handle components carefully, route cables without trapping them, and test navigation and audio before reassembly. If your vehicle has integrated controls or a camera, include those functions in the test rather than checking only whether the screen turns on.
How do I check which navigation stereos fit my vehicle?
Use the exact year, make, and model, then compare them with the stereo’s stated vehicle fitment. Identify the original radio type and any differences in the dashboard or controls. A listing for a vehicle family may not cover every model year or configuration. Matching the make alone, for instance, doesn’t confirm that the radio’s shape, connections, and required accessories suit your vehicle.
What wiring harness and dash kit are needed for a radio replacement?
The required harness and dash kit depend on the vehicle’s factory connectors, replacement radio, and dashboard opening. A harness connects the radio wiring to the vehicle, while a dash kit helps secure and finish the unit in the opening. If the plugs differ, a compatible adapter may be needed. Identify the original radio and compare the replacement’s connection and mounting requirements before starting work.
What are the best navigation head units with Apple CarPlay and Android Auto?
Choose a compatible head unit that supports the smartphone features you plan to use. Compare its stated Apple CarPlay or Android Auto capability, vehicle fit, control layout, and navigation options. Don’t choose by screen appearance alone. A unit that suits your daily use but doesn’t fit the vehicle or connect properly is a poor match. Decide whether you prefer phone-based directions or navigation through the stereo.
Can I retain the factory backup camera, steering-wheel controls, and amplifier?
These features may be retained if the replacement radio and required vehicle-specific interfaces support them. Check each function separately: retaining the camera doesn’t automatically preserve steering-wheel controls or an amplifier connection. For example, steering-wheel buttons may need a control interface. Record which features work before installation, then test each one with the new radio connected.
How do I install a navigation head unit step by step?
Follow this sequence: identify the vehicle and head-unit fit, prepare the matching wiring and mounting parts, carefully remove the factory radio, and connect the replacement without forcing plugs. Route accessory cables safely, then test navigation, sound, and connected vehicle functions before securing the unit and refitting trim. For a vehicle in Hillsborough County, a final function check helps ensure the setup is ready for local driving.