
How to Choose a Dash Cam Setup for Hardwiring in Apollo Beach
Hardwiring connects a dash cam to the vehicle’s electrical system, and using a constant-power fuse slot can activate parking mode. An ignition-switched fuse lets the camera respond to the ignition, while a suitable chassis earth completes the setup. For a hardwire dash cam service in Apollo Beach, the right fuse choices and a careful power test matter as much as the camera itself.
A hardwired setup can provide recording without a cable hanging from a power socket, and may keep the camera running when you park. The installation should suit your vehicle and recording needs, whether you want a front-facing view or coverage of the front, rear, and cabin.
This guide covers the benefits of hardwiring, camera layouts, fuse selection, and installation considerations. It also explains why careful cable routing and testing are essential for a neat, dependable fit.
Key Takeaways
- Learn how constant-power and ignition-switched fuse slots affect parking mode and camera behavior.
- Choose between front-only, front-and-rear, and three-channel coverage based on what you want recorded.
- See why fuse-box location and suitable power connections vary by vehicle.
- Understand how careful cable routing, camera placement, and testing contribute to a professional fit.
- Find out when PFM Performance Auto Group’s car dashcam installation can help bring your setup together.
Choosing constant-power and ACC fuse slots
Yes. A constant-power fuse slot can keep a dash cam recording in parking mode. Use a hardwire kit with low-voltage battery protection so parked recording can stop before the vehicle battery is excessively discharged.
-
Find Constant-Power and Ignition-Switched Fuses
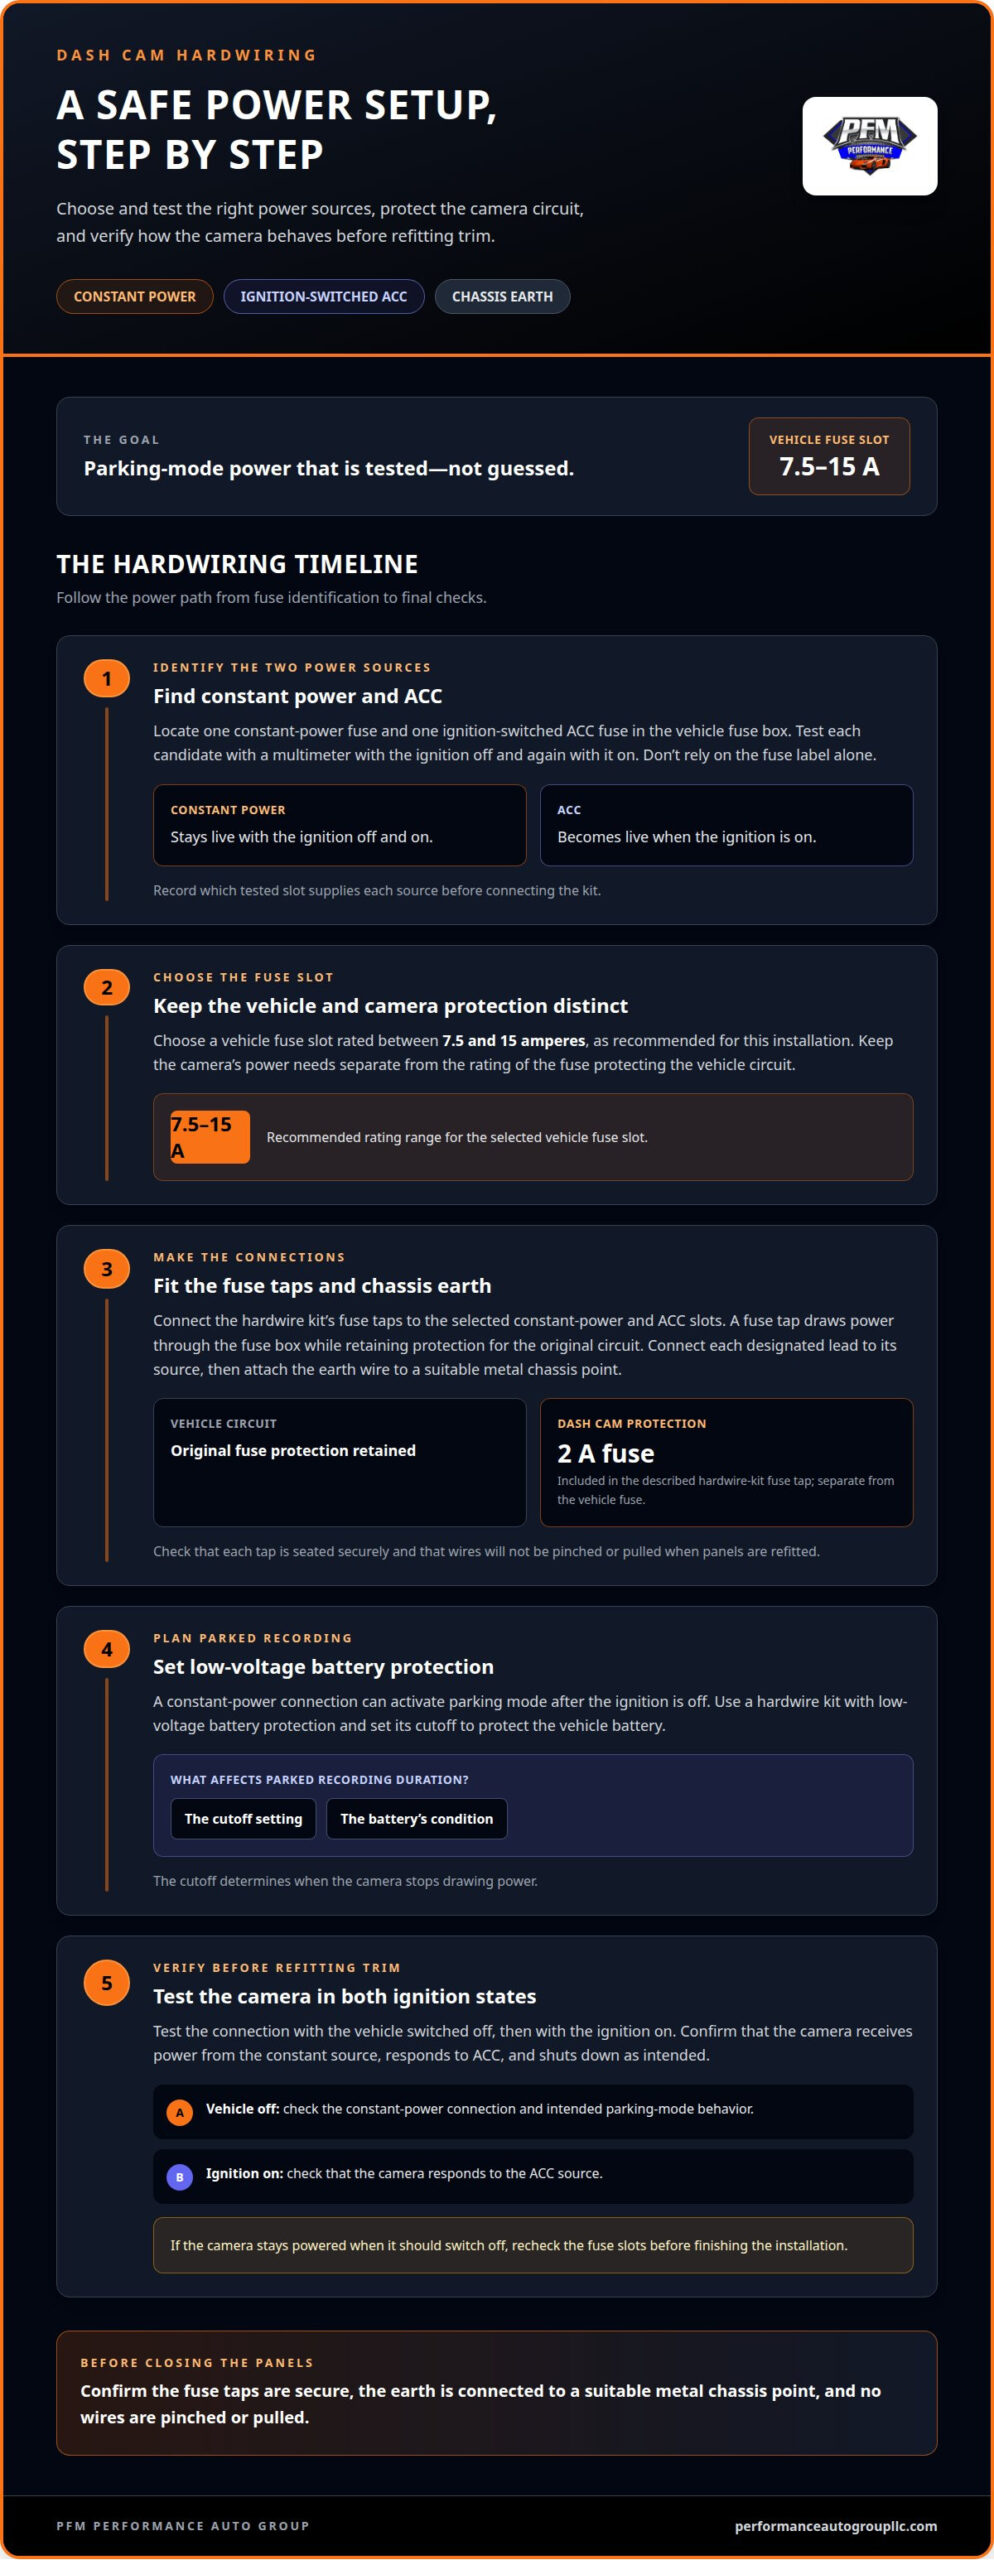
Identify one constant-power fuse and one ignition-switched ACC fuse in the vehicle’s fuse box. Test each candidate with a multimeter, checking power with the ignition off and again with it on. A constant-power slot stays live in both conditions; an ACC slot becomes live when the ignition is on. Don’t rely on the fuse label alone. Testing confirms how the slot behaves in your vehicle.
Choose a vehicle fuse slot rated between 7.5 and 15 amperes, as recommended for this installation. Keep the camera’s power needs separate from the fuse rating already protecting the vehicle circuit. Record which tested slot supplies constant power and which switches with the ignition before connecting the kit.
-
Connect the Hardwire Kit to the Fuse Box
Connect the hardwire kit’s fuse taps to the selected constant-power and ACC slots. A fuse tap, also called a fuse spur, draws power through the fuse box while retaining protection for the original circuit. Connect the kit’s designated leads to each source, then attach its earth wire to a suitable metal chassis point.
The hardwire-kit fuse tap described for this setup includes a 2-amp fuse intended to protect the dash cam. Keep that camera-protection fuse distinct from the vehicle fuse. Before you install the trim again, check that each tap is seated securely and that the wires won’t be pinched or pulled when panels are refitted.
-
Plan Parked Recording and Battery Protection
Choose a constant-power connection if parked recording matters, because it can activate parking mode after the ignition is off. Set the hardwire kit’s low-voltage cutoff to protect the vehicle battery. This setting determines when the camera stops drawing power, so recording duration while parked depends on the cutoff and the battery’s condition.
Test the connection with the vehicle switched off, then with the ignition on. Confirm that the camera receives power from the constant source, responds to ACC, and shuts down as intended. If it stays powered when it should switch off, recheck the fuse slots before finishing the installation. Testing verifies the power behavior and battery-protection setup.
Front-only, front-and-rear, and three-channel camera setups
Choose a camera layout by deciding which areas around your vehicle you want to record. The channel count describes the coverage, so match it to your priorities before planning the installation.
- Choose front-only coverage if the road ahead is your priority. A 1-channel dash cam records the view in front of the vehicle. This is the most direct layout when you want a forward-facing record without adding a rear or interior camera. Consider where the windshield view should be positioned, and whether a front-only view matches the incidents you want captured.
- Select front-and-rear coverage for views at both ends. A 2-channel dash cam records the front and rear. The rear camera adds another placement and cable-routing decision, so include its position in your setup plan. Choose a position for the rear camera that provides the intended view, and make sure the glass is clean.
- Consider three-channel coverage if the cabin view matters. A 3-channel dash cam records the front, rear, and interior. That layout offers views of three areas, but it also adds an interior camera to position and test. Decide whether recording the cabin addresses your needs, rather than choosing extra coverage without a clear purpose.
- Plan camera placement and cable paths together. Position the front camera behind the rear-view mirror, usually on the passenger side, within the windscreen wiper sweep. Route a rear camera’s cable along the passenger side, away from areas that may contain airbags or sensitive components. Consider both the camera view and cable path before fitting trim.
- Test every camera before finishing the installation. Connect a rear camera temporarily first, then check that it operates and look for possible DAB radio interference. A ferrite core can help reduce signal disruption if the rear camera causes interference. Connect both cameras and test recording before refitting vehicle trim. To discuss a setup and fitting, book a dash cam installation appointment.
Finding the vehicle fuse box
Locate the fuse box before planning a hardwire installation. Access points and fuse layouts vary by vehicle, so consult the documentation for your specific model instead of assuming another model has the same arrangement.
- Start with the vehicle owner’s manual and find its fuse-box section. Use the index to locate diagrams, cover markings, and access instructions for your model. A 2020 Toyota Corolla Sport is one example vehicle, but its layout shouldn’t be assumed to match another Corolla year or trim. Follow the documentation for the exact vehicle being fitted.
- Use the vehicle documentation to identify each fuse-box location. Diagrams may distinguish locations by names such as passenger compartment or engine compartment; follow the terms used for your model. Don’t choose a box just because it is easiest to reach. The selected location must provide access to the circuits needed for the hardwire kit.
- Park securely and switch off the vehicle before opening the documented access panel. Keep the manual or diagram beside the fuse box and compare its labels with the markings on the cover. If they differ, pause rather than guess. A mistaken fuse position can affect a circuit unrelated to the dash cam.
- Check the fuse-box cover for a diagram before removing a fuse. Note the names and ratings shown, then compare them with the manual. Treat the markings as a map, not proof that a slot has the power behavior you need. Vehicle configurations can differ, even between cars with the same model name.
- Check whether the fuse panel is accessible without forcing trim or stretching wiring. Keep the area visible and avoid disturbing nearby connectors or vehicle components. If access is obstructed or you cannot confidently match the fuse layout, stop before connecting the kit. This helps maintain a clear path for careful installation.
- Record the box location and the candidate fuse positions for the installer. Include the vehicle’s make, model, and year, plus any trim detail shown in its documentation. For example, distinguish a 2020 Toyota Corolla Sport from a different model year. This information helps match the correct diagram before work begins.
- Use the fuse-box location to begin the installation plan, not to make the final choice. Confirm the selected slots’ behavior and suitability before fitting a fuse tap. A vehicle-specific diagram helps identify candidates; testing establishes how they work. Keep the manual handy, especially if the vehicle has multiple fuse-box locations.
Professional dash cam fitting
When comparing dash cam installers near Apollo Beach, consider vehicle compatibility, safe cable routing, camera placement, and testing. A careful installation accounts for airbags, pedals, steering components, and factory wiring.
- Confirm the installation suits the vehicle. Dash cam installation methods vary by vehicle, so the plan should reflect its layout. A setup that works in one model may need a different cable route or mounting position in another. Compare installers by how they plan around the specific vehicle, rather than assuming the same route works for every car.
- Set the front camera position before securing it. Place it behind the rear-view mirror, usually on the passenger side, within the windscreen wiper sweep. This helps keep the view clear and the camera out of the main forward sightline. Check the intended view before attaching the mount.
- Route front-camera wiring away from vehicle controls. Keep cables clear of airbags, pedals, and steering components. Follow factory wiring where possible, and avoid routes that could interfere with pedal or steering movement. Plan for these areas before concealing the wire behind trim.
- Test a rear camera before fitting it permanently. Connect it temporarily and check that it works before settling on the final route. This early test can also reveal possible DAB radio interference. If the rear camera disrupts the signal, a ferrite core can help reduce interference.
- Plan the rear-camera route along the passenger side. Keep the cable away from areas that may contain airbags or sensitive components. Position the camera at the bottom centre of the rear windscreen, on clean glass. Check that the view is suitable before completing the installation.
- Test both cameras before refitting trim. Connect the front and rear cameras and confirm that both record. Testing while the wiring is accessible makes it easier to address connection or placement issues before refitting panels. A neat finish matters, but confirm recording first.
- Compare the fitting process, not just the finished appearance. Look for a vehicle-specific plan, routes kept clear of safety components, and camera testing before trim goes back. Those steps show how the installation protects the function of both the camera setup and the vehicle’s interior. For help arranging a fitting, book a dash cam installation appointment.
Before concealing the wiring, check that the cable route avoids airbags, pedals, and steering components. Where possible, cables should follow factory wiring. Verify the route while it is still visible, so the installer can ensure it stays clear of these vehicle components throughout the fitting process.
Do local installers hardwire front-only and front-and-rear dash cams?
Yes. Both front-only and front-and-rear setups can be hardwired. The right installation depends on the vehicle, camera layout, and safe routing for each cable.
- Choose the camera layout before planning the fitting. A 1-channel camera records the front view, while a 2-channel setup records front and rear. The additional rear camera changes the installation plan because its cable must reach the rear windscreen. Decide which views you want recorded, then match the wiring approach to that setup.
- Match the installation method to the vehicle. Dash cam installation methods vary by vehicle, so the installer should plan for its specific layout. A route suitable for one model may not suit another. Fuse-box access, trim, and cable paths all influence how the setup can be fitted.
- Set the front camera position carefully. The recommended position is behind the rear-view mirror, usually on the passenger side, within the windscreen wiper sweep. This keeps the recorded view within the cleared part of the glass. Confirm the view and placement before securing the camera.
- Plan rear-camera routing as part of a two-camera fit. Route the cable along the passenger side, away from areas that may contain airbags or sensitive components. Place the rear camera at the bottom centre of the rear windscreen, on clean glass. Keep the route tidy and clear of vehicle controls.
- Test the rear camera before completing installation. Connect it temporarily and check that it works before fitting it permanently. This also gives the installer a chance to identify possible DAB radio interference. If the camera disrupts the signal, a ferrite core can help reduce that interference.
- Review the installation checks before trim is refitted. For a front-and-rear setup, connect both cameras and test recording while the wiring is accessible. This makes it easier to catch camera or connection issues before panels cover the cable route. A front-only setup still needs its camera and power connection tested.
- Compare installers by the process they follow. Look for vehicle-specific planning, routes that avoid airbags and controls, suitable camera placement, and recording tests before trim is refitted. These are more useful comparison points than appearance alone, especially when a rear camera adds wiring through the cabin.
During planning, ask the installer to explain how the cable route will stay clear of airbags, pedals, and steering components. Treat these areas as constraints from the outset, not as details to check only after routing the cable. A neat-looking route is not sufficient if it crosses any of them. Where possible, the installer should follow factory wiring as a guide while keeping the cable clear of vehicle components.
Before work begins, clarify how these routing priorities apply to your camera layout. This makes cable routing part of the plan alongside placement and testing, and gives you a basis for discussing the proposed path. Ask for an explanation if the route approaches an airbag, pedal, or steering component.
PFM Performance Auto Group: Car Dashcam installation
PFM Performance Auto Group provides car dashcam installation for drivers who want help fitting a front-only or front-and-rear setup. Choose the service when you want camera placement, vehicle-specific cable routing, and final recording checks handled as part of the installation.
Share which views you want to record and whether parked recording matters. Those choices shape the setup, while the vehicle’s fuse layout and interior determine the fitting approach. A professional installation brings the camera and hardwiring decisions together, with attention to a tidy finish and the vehicle’s components.
For drivers in Apollo Beach, PFM Performance Auto Group is a practical next step after choosing a camera layout. Contact PFM Performance Auto Group to discuss car dashcam installation for your vehicle.
Make Your Next Setup Decision with Confidence
Your dash cam should suit how you use your vehicle, not simply add another device to the windscreen. If you’re considering a hardwire dash cam service in Apollo Beach, turn your priorities into a fitting plan that matches your vehicle and desired camera coverage.
PFM Performance Auto Group provides car dashcam installation. The shop also offers Auto Window Tinting, Commercial Window Tinting, and Home Window Tinting for different spaces and needs. For this article’s focus, start with the dash cam setup you want and discuss the installation that brings it together.
Reach out to arrange a conversation about your setup. A considered next step can make choosing and fitting your camera feel more straightforward.
Choose the coverage that suits you, and move forward with confidence.
Frequently Asked Questions
Why use hardwire installation?
Hardwiring gives the camera a direct vehicle power connection rather than relying on a removable plug in a power socket. For example, a constant-power connection can support parking mode after you leave the vehicle. A hardwire kit’s low-voltage cutoff helps protect the vehicle battery by stopping camera power at its set threshold. The setup suits drivers who want parking coverage and a clean, integrated power connection.
Which shops near Apollo Beach, Florida install hardwired dash cams?
PFM Performance Auto Group provides car dashcam installation for drivers in Hillsborough County. If you need a hardwire dash cam service in Apollo Beach, arrange an installation and share your vehicle details, camera layout, and hardwiring needs. This information helps shape the fitting around your specific car and setup.
How long does professional dash cam hardwiring take?
Installation time depends on the vehicle and camera setup. A front-only camera needs a different cable route from a front-and-rear system, which must also reach the rear windscreen. Vehicle trim, access to the relevant wiring, and time needed to test recording and confirm operation all affect the work. Plan around your setup and vehicle, not a universal time estimate.
What is included in a professional dash cam hardwire installation?
A professional fitting combines camera placement, the vehicle power connection, cable routing, and function checks. A multi-camera setup also requires attention to the rear camera and its cable route. The installer should check that recording works before refitting the trim, so any connection issue can be addressed while the wiring is accessible. The steps depend on the vehicle and camera layout.
How do I book a dash cam installation near Apollo Beach, and do shops offer mobile service?
Arrange car dashcam installation with PFM Performance Auto Group through its appointment process. For a hardwire dash cam service in Apollo Beach, share your vehicle details and whether you want front-only or front-and-rear coverage. PFM’s installation takes place at its shop, so plan to bring your vehicle in. Including your preferred setup when booking helps tailor the installation to your needs.