
Car Window Tint Removal and Replacement in Tampa
Bubbling or peeling tint can distort the view through your glass, and a failing film usually needs careful removal before replacement. For car window tint removal and replacement in Tampa, the new tint must also meet Florida’s light-transmission limits: at least 28% for front side windows, 15% for windows behind the driver on cars, and 6% for those windows on SUVs, vans, and pickup trucks.
When tint is discolored, lifting at the edges, or gathering debris, it’s understandable to want a clean finish without damaging the glass. The right solution depends on the film’s condition and where it is installed, especially on rear glass with defroster lines.
This guide explains what bubbling, peeling, and discoloration can signal, how removal and adhesive cleanup prepare glass for fresh tint, and what affects the work in Tampa. It also clarifies the difference between removal-only service and removal followed by replacement, so you can decide what suits your vehicle.
Key Takeaways
- Florida’s tint limits vary by window position and vehicle type, so match replacement film to the glass it will cover.
- Bubbling, peeling, and uneven discoloration can signal that film is no longer performing or looking as intended.
- Rear-window defroster lines call for extra care during removal to help protect the glass.
- Removing failed film and cleaning adhesive residue prepare the glass for a fresh, even installation.
- Clear photos of affected windows and rear glass can help show the scope of the work before an estimate.
Automotive window tinting in Tampa
Replacement tint should suit the vehicle, your preferred appearance, and the window it covers. Dyed, carbon, metallic, and ceramic films differ in construction, finish, and heat-rejection characteristics.
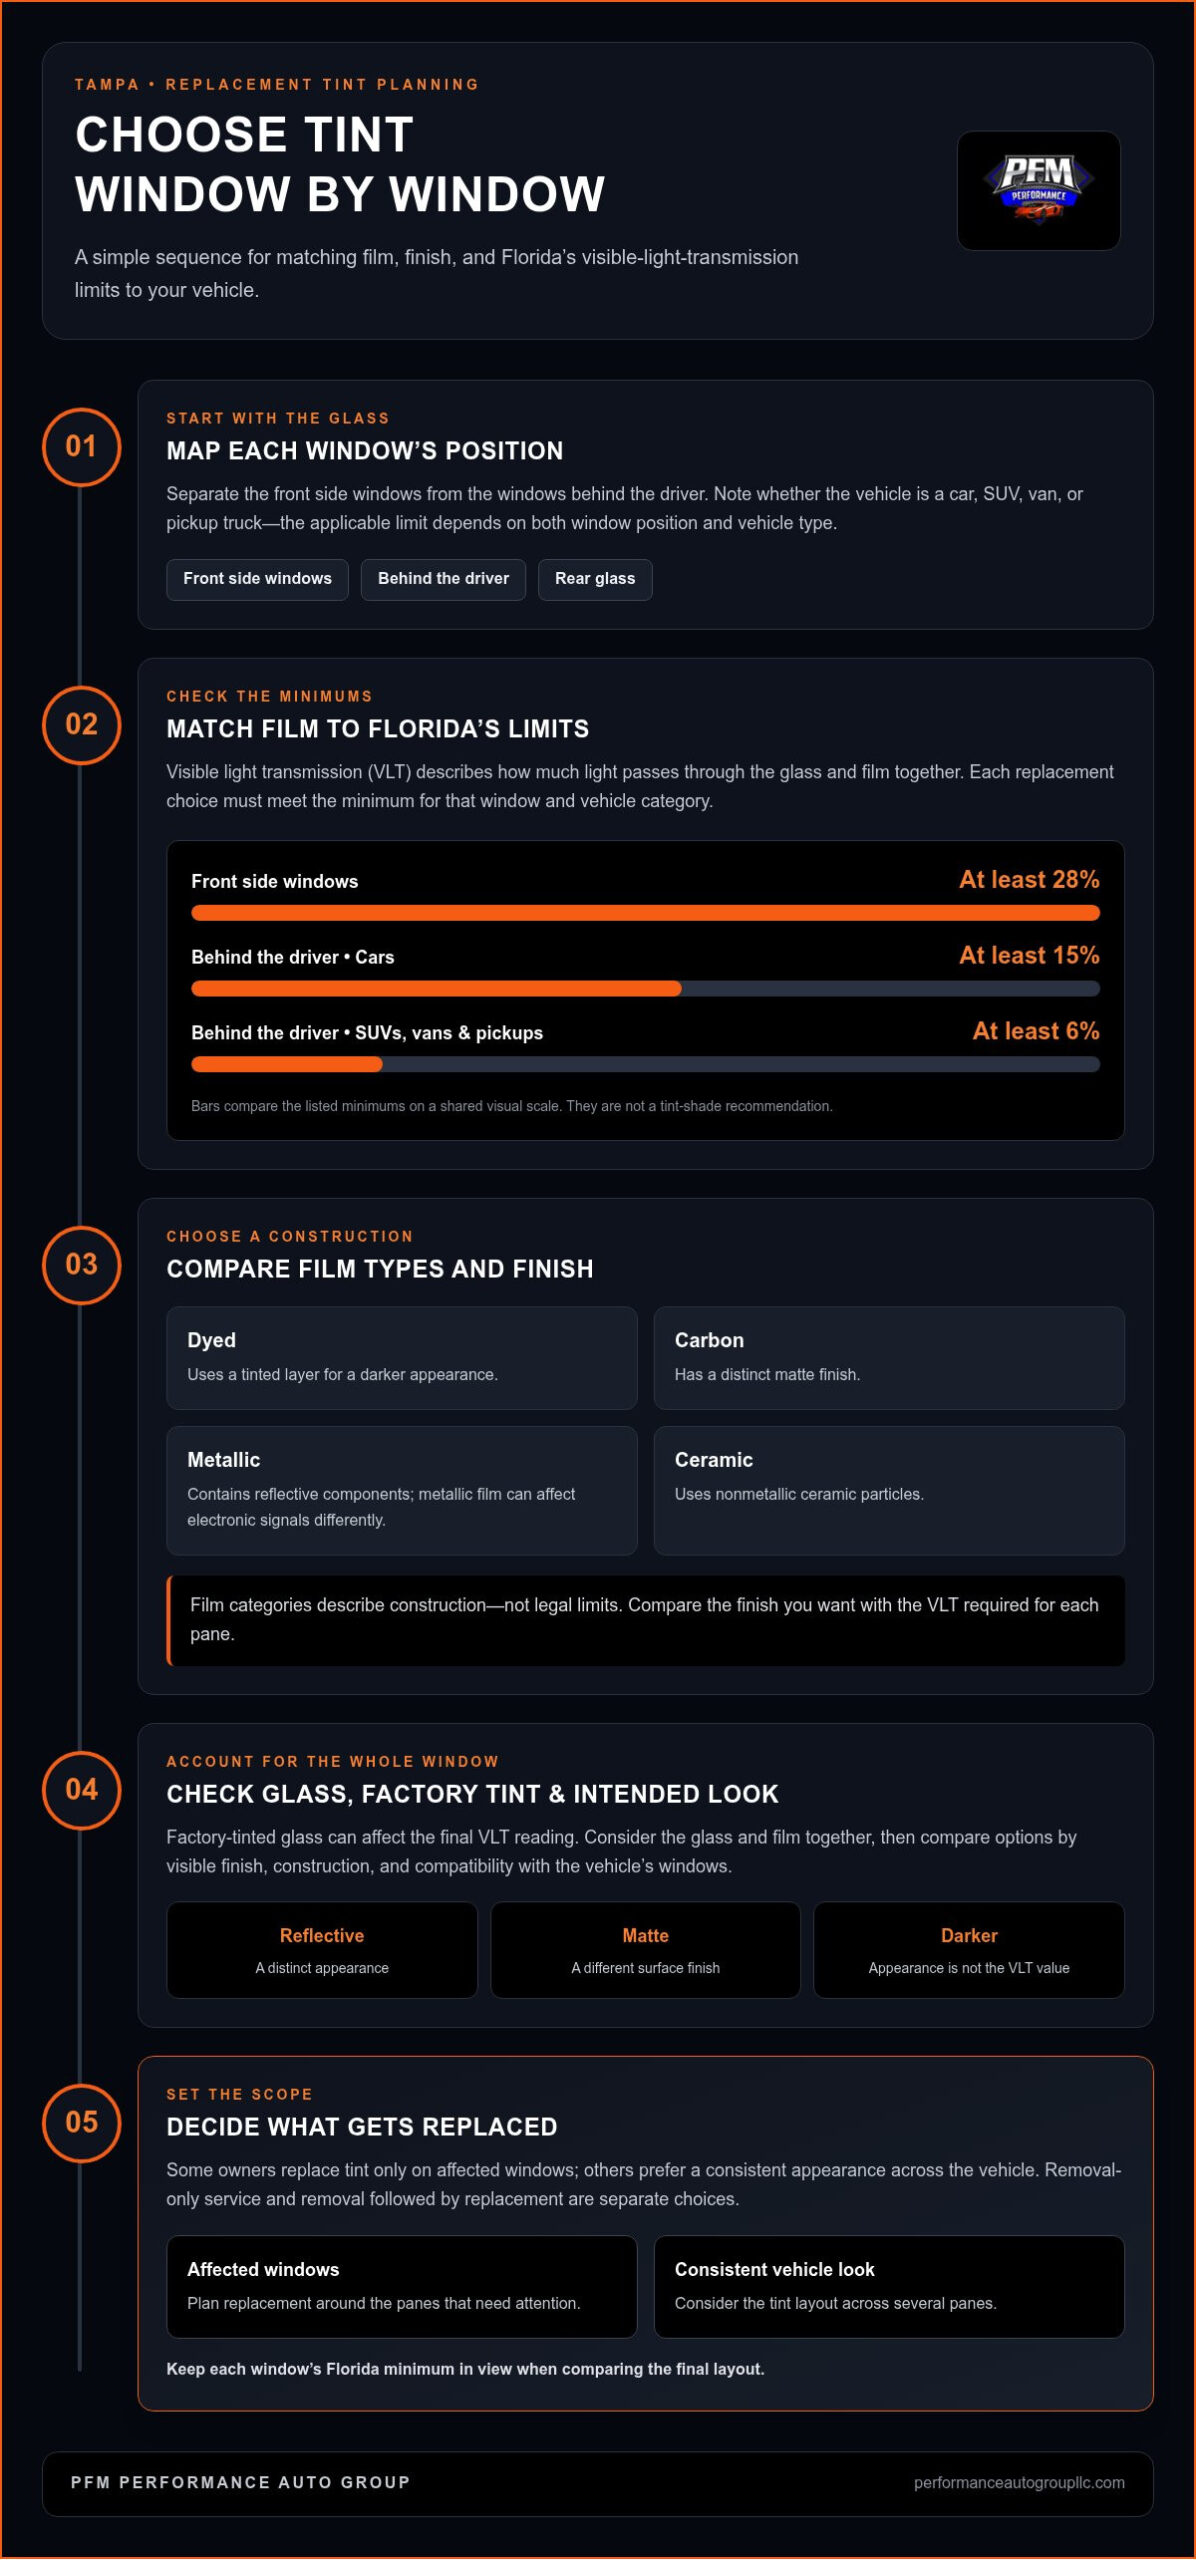
Florida’s visible-light-transmission limits shape the choice: front side windows must allow at least 28% of light through. Windows behind the driver must allow at least 15% on cars, and at least 6% on SUVs, vans, and pickup trucks.
Replacement Tint Types
Dyed film uses a tinted layer for a darker appearance, while carbon film has a distinct matte finish. Metallic film contains reflective components, and ceramic film uses nonmetallic ceramic particles. These categories describe film construction, not legal limits. When replacing tint, consider the glass position, your preferred look, and how the film suits the vehicle’s use.
Comparing Replacement Tint Options
Compare options by visible finish, film construction, and compatibility with the vehicle’s windows. A reflective look differs from a matte or darker appearance, while metallic and nonmetallic films can affect electronic signals differently. Check the film’s visible light transmission for each window, then compare it with Florida’s limit for that window and vehicle type.
Florida’s limits set minimum light transmission, not one tint shade for every window. A film’s darkness and its visible-light-transmission value are related, but the value describes how much light passes through the glass and film together. Factory-tinted glass can also affect the final reading, so consider the combined result when choosing replacement film.
Plan the tint window by window. Identify the front side windows, the glass behind the driver, and the rear glass, then match each position to its applicable Florida threshold. A film suitable for one window or vehicle category may not meet the requirements for another.
- Front side windows: Select film that allows at least 28% of light through.
- Cars, windows behind the driver: Allow at least 15% of light through.
- SUVs, vans, and pickup trucks, windows behind the driver: Allow at least 6% of light through.
Appearance is only one consideration. Decide whether a reflective, matte, or darker finish suits the vehicle, and whether devices inside rely on signals that metallic film may affect. Note any different glass types or factory tint when planning replacement. A professional assessment can consider the glass and intended finish together.
Replacement is an opportunity to reconsider the tint layout. Some owners replace only affected windows; others prefer a consistent appearance across the vehicle. Keep each glass position’s legal threshold in view, and compare films by construction and finish, not darkness alone.
Bubbling, peeling, and discolored tint
Bubbles, lifting edges, and faded patches are visible signs that automotive tint has changed. Note which windows are affected and whether the issue obstructs your view before arranging removal or replacement.
Peeling Tint
Peeling often starts at a window edge or corner, where lifted film can collect dust and debris. As the adhesive bond fails, the loose area typically grows rather than settling back into place. Inspect each pane in daylight and note whether the film lifts at an edge, around a curve, or across the viewing area.
Discolored Tint
Aging tint can change color or fade unevenly, making a vehicle look worn even when the film remains attached. Compare the side windows; a purple or patchy pane can stand out beside darker, more consistent glass. Ceramic film is one replacement option, but choose based on glass position, appearance, and Florida’s tint limits.
Bubbles can also distort the view through the glass. A cluster across the driver’s sightline differs from a small bubble near an edge, but both matter when assessing visibility and film condition. Don’t press or puncture a bubble to flatten it. That will not restore the adhesive bond and may leave a visible mark.
Use a simple inspection routine before arranging work:
- View each automotive window from inside and outside in daylight.
- Record whether you see bubbles, peeling edges, color changes, or uneven fading.
- Take clear photos of affected panes, including rear glass, to show the scope of the job.
These details help distinguish a local defect from a need to replace tint across several windows. Peeling on one door window, for example, may call for a different scope than fading across multiple panes. Removal and replacement are separate choices, so decide whether you want the film removed only or new tint installed afterward.
When comparing tint options, read the actual warranty terms rather than assuming a phrase such as “lifetime warranty” covers every issue. Check what the warranty covers, including film defects and installation. Glass position and existing tint also matter when choosing replacement film that meets Florida’s applicable light-transmission limits.
If the film is affecting your view or its edges keep lifting, photos can help start a focused discussion about removal and replacement. Book an automotive tint appointment to discuss the affected windows and the next step.
Installation quality and workmanship
A neat tint job depends on more than film type. Removal and installation require careful attention to the glass, its edges, and any rear-window defroster lines. For example, a clean center can still look unfinished if the film edges leave gaps or visible debris.
Rear glass needs particular care. Defroster lines make tint removal more delicate and require careful assessment. Identify the rear-window grid and inspect the film around it before work begins. This helps guide the removal approach and keeps the grid in view throughout the process.
A careful installation follows a clear sequence:
- Inspect: Note the glass shape, existing film condition, edges, and rear defroster lines.
- Prepare: Remove old film and residue, then clean the glass so particles don’t sit beneath replacement film.
- Fit: Shape and position the new film to match the window, with close attention to edges and curves.
- Review: Examine the finished pane from different angles for alignment, trapped debris, and visible imperfections.
Each step affects the next. Leftover adhesive can interfere with a smooth finish, while inaccurate positioning can leave an uneven border. On curved rear glass, the film must fit and be handled carefully across the full pane, not just in the center.
Choose film based on its documented properties, not a broad label alone. Ceramic film is one option, and product information can describe its heat-rejection and UV-protection characteristics. Compare those specifications with your priorities, then consider the film’s appearance and the window positions receiving it. Not every ceramic film performs identically.
An “advanced” process is meaningful when the work shows precision. Look for consistent edges, a uniform appearance, and a clear explanation of how rear defroster lines will be handled during removal. These details relate directly to your vehicle’s glass and are more useful than general claims about installation quality.
After installation, follow the care instructions before cleaning the windows or operating them. The film needs time to adhere to the glass, and early handling can disturb the application. Review each pane in daylight, including the corners and lower edges, and raise any visible concerns before leaving.
For a Tampa vehicle with rear defroster lines, include a clear photo of the rear glass when describing the job. This helps focus the assessment on the most delicate part of removal and replacement.
Adhesive cleanup and glass preparation
For replacement tint, failed or outdated film should generally be removed before the glass is cleaned and prepared. Rear-window defroster lines make removal more delicate, so assess their condition carefully during the process.
Adhesive Cleanup
Film removal is only part of the job: adhesive cleanup is included in the stated removal scope. Residue can prevent the glass from being properly prepared for replacement. Cleanup should cover the full pane, including edges and corners where old adhesive may remain after the film comes away.
Inspect the glass from different angles after removal. A clear center, for example, can still have residue near the lower edge. The pane is ready for preparation when no adhesive patches or film fragments remain visible.
Glass Preparation
Before applying replacement film, the glass needs a clean, even surface. Preparation means checking the whole pane for residue and debris, then cleaning it so particles do not become trapped beneath the new film. This matters on side windows and rear glass alike.
Describe the desired tint shade and the windows involved before installation. Automotive glass differs from residential windows, so a vehicle’s curves and edges matter when planning the work. Whether you choose ceramic or another film type, prepare the glass before application.
Protecting Rear-Window Defroster Lines
Rear-window defroster lines make tint removal more delicate and require careful assessment. The lines sit on the glass beneath the film, so removal must account for their position rather than treating the rear pane like a plain side window.
Start by inspecting the grid and noting its condition before removal. This assessment guides careful work around each line and informs adhesive cleanup. Keep the grid visible throughout the process instead of scraping in a way that obscures it.
Can old, bubbling, or damaged tint be removed without damaging the defroster lines? Removal needs careful handling because the lines make the work more delicate. Inspect the grid and assess the glass before choosing an approach. A clear photo of the rear window can show the lines and affected film.
Once the glass is clean and prepared, plan replacement around the vehicle’s windows and your preferred appearance. This sequence supports a consistent finish and helps deliver the comfort and clarity you expect from fresh tint.
Professional window tint removal and replacement in Tampa
A sound decision compares the job scope, film, legal light transmission, and written terms. In Tampa, removal and replacement are scoped separately because each depends on the glass and film condition.
Comparing Shop Reviews and Quotes
Look for reviews that describe removal, adhesive cleanup, rear glass, and finished edges. A review about work on a bubbling rear window offers more relevant context than a general comment about customer service. Read several and look for consistent descriptions of the work.
Compare estimates for the same scope: removal only, or removal followed by replacement. Check whether each accounts for film condition, adhesive, window position, rear defroster lines, and how long the film has been installed. Clear photos of affected windows and rear glass can help show these details.
Removal and Installation Price Factors
Pricing is competitive, and the scope depends on the vehicle and work involved. Factors include film and adhesive condition, window position, rear defroster lines, how long the film has been on the vehicle, and whether the work includes removal only or replacement tint.
Ask for a scope that separates removal from new installation, then compare equivalent work. A sedan with film on side windows presents a different job from an SUV with damaged rear glass and defroster lines. Ceramic tint is a film choice, not a substitute for assessing the removal work.
Florida’s legal limits depend on vehicle type and window position: front side windows must allow at least 28% of light through. Behind the driver, windows must allow at least 15% on cars and at least 6% on SUVs, vans, and pickup trucks.
To check existing tint, measure visible light through the glass and film together, then compare the result with Florida’s applicable limit for that window. Check front side glass separately from windows behind the driver, and distinguish a car from an SUV, van, or pickup.
Removal, Installation, and Film Warranties
Warranty coverage varies by shop and film. Compare written terms that clearly distinguish film defects, installation workmanship, and removal work; coverage for one does not automatically describe the others. Keep the warranty document with the vehicle records.
Before accepting an estimate, review what the warranty excludes and how a claim is handled. Film defects and installation workmanship can involve different coverage. A written description makes those distinctions clearer than the word “warranty” alone.
The wait before rolling windows down depends on film curing and installation conditions. Follow the care instructions for the specific installation; moving a window before the film has settled can disturb its edges.
Use the written estimate to confirm scope, window positions, chosen film, and warranty terms. Tampa customers can also share clear photos of affected glass, especially the rear window, to describe the vehicle’s condition.
PFM Performance Auto Group: Auto Window Tinting
PFM Performance Auto Group provides Auto Window Tinting for drivers considering fresh tint after old film has bubbled, peeled, or discolored. Start by identifying the affected windows and deciding whether you want removal only or removal followed by replacement.
For replacement, choose film based on the vehicle’s glass, your preferred appearance, and Florida’s light-transmission requirements. Black Pearl Nano Ceramic Window Tint By Madico is one option for your new tint. A clear description of the affected panes, including rear glass, helps define the next step.
For automotive tinting or replacement guidance, contact PFM Performance Auto Group or visit performanceautogroupllc.com.
Choose a Clear Next Step for Your Tint
If you’re considering car window tint removal and replacement in Tampa, first decide whether you want clear glass without film or a refreshed look with replacement tint. That gives the work a useful starting point and keeps the scope focused on your vehicle.
PFM Performance Auto Group provides Auto Window Tinting, Commercial Window Tinting, and Home Window Tinting. For a vehicle project, discuss the condition of the existing tint and the finish you want. A focused plan can make it easier to move forward with clarity and care.
Take the next step when you’re ready. A clearer view and a refreshed look can begin with a focused plan for your glass.
Frequently Asked Questions
Bubbling or peeling car tint?
Bubbling or peeling tint usually means the film is failing and may affect visibility or appearance. If a bubble is in your driving view or a peeled edge keeps lifting, arrange an assessment rather than pulling the film yourself. Peeling can leave adhesive behind, and removal near rear defroster lines needs particular care. Note which windows are affected so the work can be scoped accurately.
How long does removal take?
Removal time depends on the film and adhesive condition, window position, rear defroster lines, and how long the film has been on the vehicle. A single side window with accessible film differs from aged film on rear glass. Share clear photos of the affected panes to describe the job. PFM Performance Auto Group can assess the scope, with particular attention to the rear window.
Which Tampa shops specialize in car window tint removal and replacement?
PFM Performance Auto Group provides Auto Window Tinting in Hillsborough County and the Tampa area. If your vehicle has failing film, describe whether you want removal only or replacement afterward, and identify any affected rear glass. This helps define the work you need. You can also discuss replacement film and your preferred appearance when planning automotive tinting.
How long does car window tint removal and replacement take?
Full-vehicle tint installation typically takes 2-4 hours, depending on vehicle size and the number of windows. That figure describes installation, not a guaranteed total for removal plus replacement. Removing old film adds work that depends on its condition, adhesive, window position, rear defroster lines, and time on the glass. A vehicle with deteriorated rear tint may need a different schedule than one receiving installation alone.
What is the process for removing old automotive window tint and adhesive?
Removal generally involves loosening and lifting the old film, cleaning adhesive residue, then inspecting the glass before replacement. Cleanup matters because leftover adhesive can keep the surface from being ready for new film. Rear-window defroster lines make removal delicate, so the grid needs assessment and careful handling. The removal approach should account for those lines rather than treating rear glass like a side window.