

Improve car audio sound quality with focused system upgrades
More power isn’t always the answer. To improve car audio sound quality, focus on balance: a subwoofer can add depth when bass sounds thin, sound-deadening can reduce road noise, and well-matched speakers can bring vocals and instruments into clearer focus. Careful gain settings and audio tuning help these upgrades work together without adding harshness or distortion.
If your music sounds thin, muddy, or tiring at highway speeds, look beyond the volume knob. Turning the system up may make the problem more noticeable, while targeted upgrades can address what’s missing and preserve the details you want to hear.
This guide explains what each upgrade can change, how sealed and ported subwoofer enclosures differ, and why amplifier gain is not a volume control. You’ll also learn how tuning brings bass, vocals, and instruments into balance, so you can plan a system around the sound you enjoy.
Key Takeaways
- Choose a sealed subwoofer enclosure for controlled, accurate bass, or consider a ported design when deeper, louder output matters and careful tuning is part of the setup.
- Prioritize door sound-deadening when road noise competes with music; treating the front doors alone can make a noticeable difference in many vehicles.
- Match replacement speakers to the power and signal from the rest of the system, rather than judging an upgrade by a single wattage label.
- Set amplifier gain to match the incoming signal, not as a volume control; excessive gain can introduce distortion.
- Plan upgrades as a system, then tune the balance so bass, vocals, and instruments work together instead of competing.
1. Adding a subwoofer
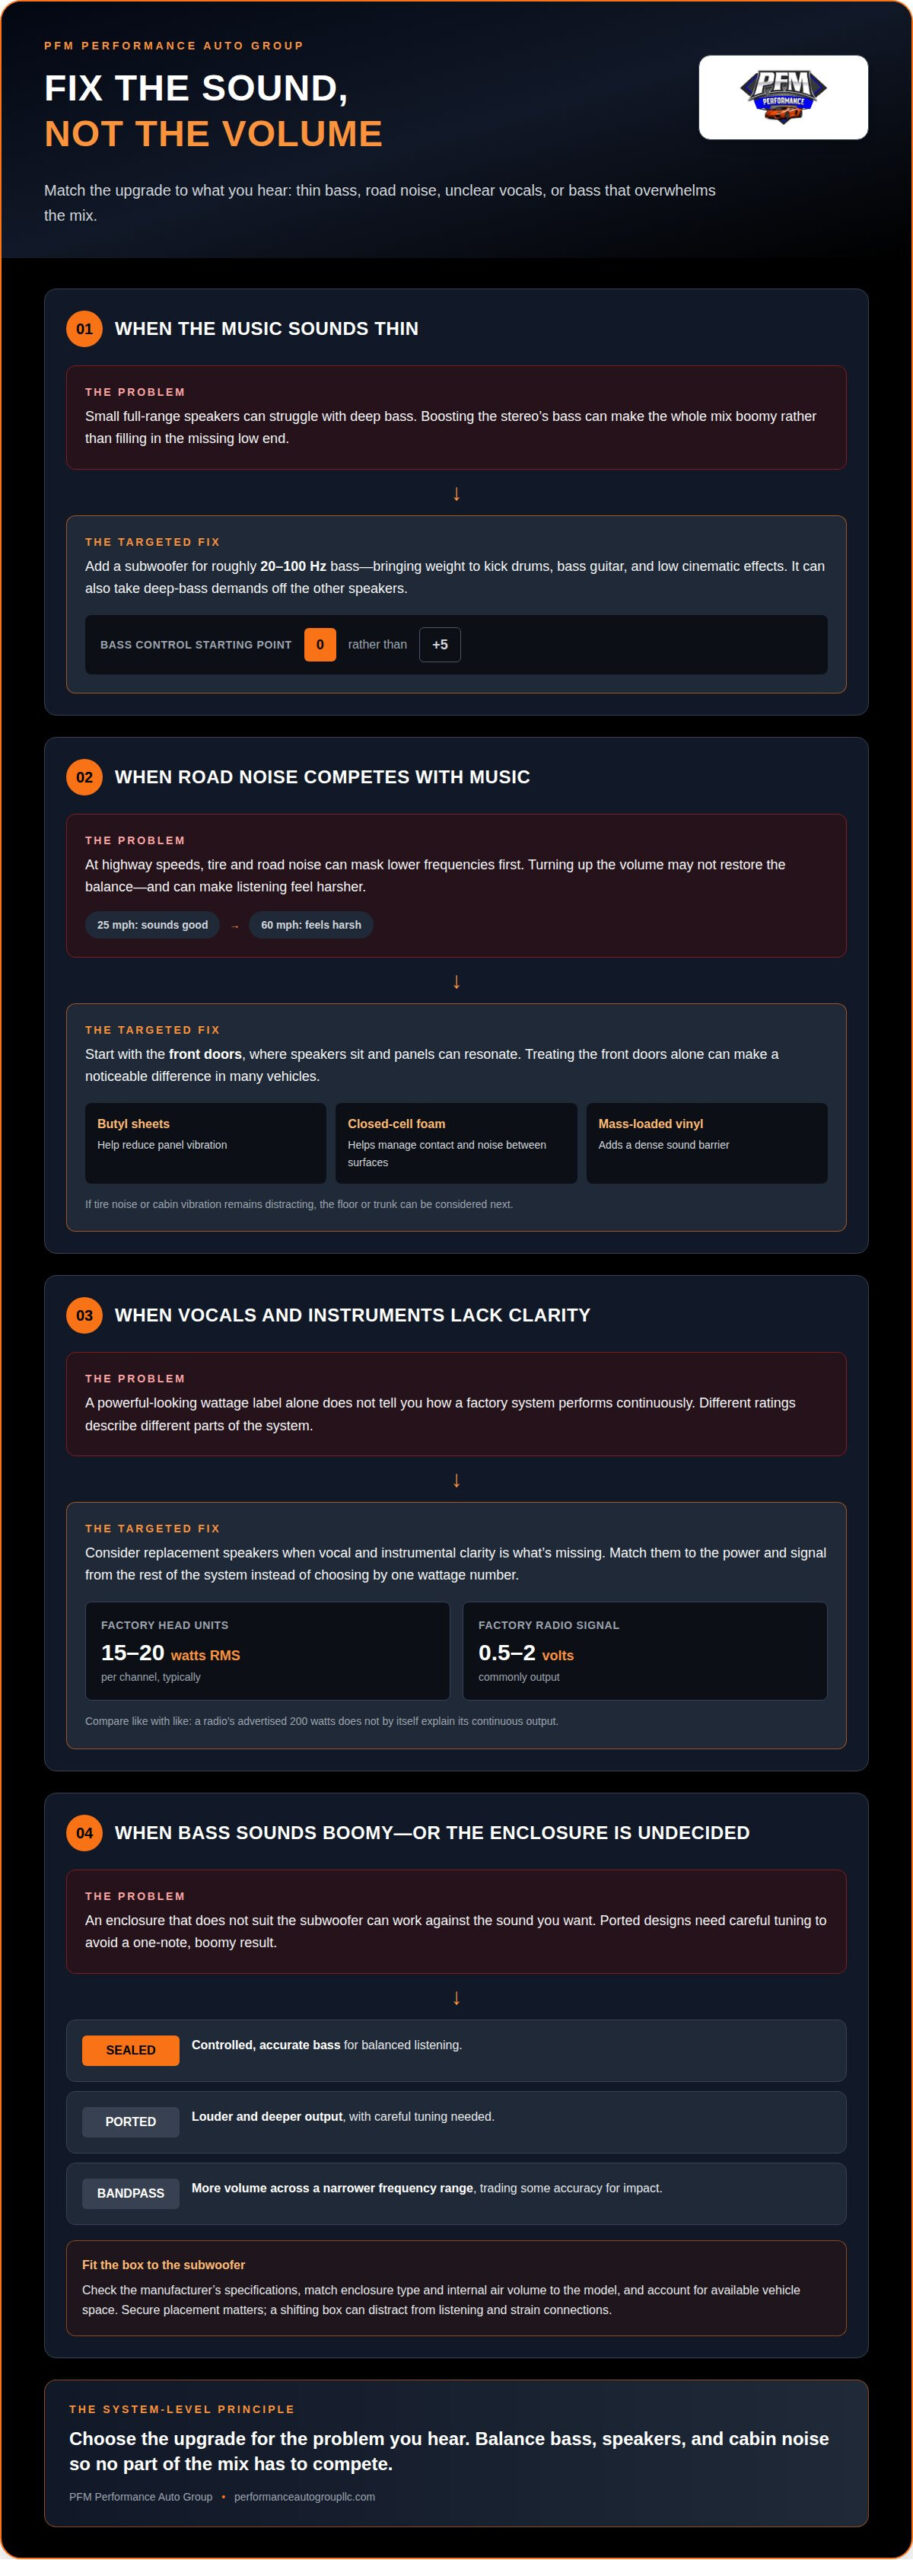
A subwoofer fills in deep bass that small full-range speakers often struggle to reproduce. It handles roughly 20-100 Hz, adding weight to kick drums, bass guitar, and low cinematic effects. By taking deep-bass demands off the other speakers, it can also let them focus on vocals and higher notes. Set the stereo’s bass control at 0 as a starting point, rather than boosting it to +5; the subwoofer should supply the low end without making the whole mix boomy.
Do car speakers or a subwoofer make the biggest difference in sound quality? It depends on what’s missing: a subwoofer adds depth when bass sounds thin, while replacement speakers can improve vocal and instrumental clarity. For a balanced system, match the upgrade to the problem you hear instead of expecting either component to fix every weakness.
Choose an enclosure for the bass you want. A sealed box supports tight, controlled bass for balanced listening. A ported box can play louder and deeper, but needs careful tuning to avoid a one-note, boomy result. A bandpass box emphasizes volume across a narrower frequency range, trading some accuracy for impact. The subwoofer and enclosure must work together: an enclosure is not a one-size-fits-all accessory.
Start by checking the subwoofer manufacturer’s specifications. Match the enclosure type and internal air volume to the model, then account for the space available in your vehicle. A custom-built box can use a trunk’s shape efficiently, while a prebuilt enclosure is suitable only when its dimensions and design match the subwoofer. Secure placement matters, too: a box that shifts in the trunk can distract from listening and strain its connections.
Consider a capacitor only as part of a demanding system’s power plan. It can provide a brief reserve during heavy bass passages, but it cannot replace suitable wiring or fix an underlying electrical supply problem. Use connections suited to the equipment, protect exposed conductors, and route cables away from heat, sharp edges, and moving parts. Incorrect polarity or loose connections can damage components, so careful installation helps protect the vehicle and system.
Placement changes how bass reaches the listening position. A trunk-mounted subwoofer may sound different when aimed toward the rear seat, hatch, or trunk lid, so compare positions and listen for even bass rather than maximum loudness. Compact powered subwoofers can fit under a seat or in a trunk, depending on the vehicle and unit. A well-integrated car audio system pairs the subwoofer, enclosure, and existing speakers so bass adds depth without overpowering the rest of the music.
2. Applying sound-deadening material to doors, floors, and trunks
Road noise can change how your stereo sounds as speed increases. A system that sounds good at 25 mph may feel harsh at 60 mph, because tire and road noise compete with music. That noise often masks lower frequencies first, making the remaining sound seem overly bright. Adding volume may not restore the lost balance. Sound-deadening material can reduce interior noise, helping musical details remain audible without turning the system up as loud.
Start with the area contributing most to the noise or vibration you notice. Front doors are a practical first treatment because they sit beside the speakers and can resonate as those speakers play. Treating only the front doors can make a noticeable difference in many vehicles. If tire noise or vibration through the cabin remains distracting, consider the floor or trunk as additional treatment areas. Prioritize carefully instead of covering every surface without a clear purpose.
Different materials address different parts of the problem. Butyl damping sheets adhere to panels and help reduce vibration. Closed-cell foam can help manage contact and noise between surfaces. Mass-loaded vinyl adds a dense sound barrier. These materials may be layered, but each needs a suitable location and fit. The aim is to control panel vibration and reduce noise entering the cabin, not simply add material wherever space allows.
Installation quality matters as much as material choice. A careful process starts by removing the relevant trim, then preparing the panel surface so damping sheets adhere properly. Apply material to broad, accessible panel areas, pressing it into place and avoiding gaps or loose edges. Keep openings, moving window parts, wiring, and drain paths clear. Foam or barrier layers must also fit without obstructing door hardware or preventing the trim from being refitted correctly.
For floors and trunks, account for contours, seams, and components before adding layers. Trunk treatment can reduce vibration from panels around the subwoofer, while floor treatment targets noise entering beneath the cabin. Excessive coverage in either area can add bulk without addressing the main noise path. Match the treatment to the vehicle’s construction and the sound you want to reduce, then refit interior panels carefully to avoid rattles.
Listen for the change in the same conditions that exposed the problem, such as highway driving or music with clear vocals and bass. Reduced road noise can make quieter details easier to hear, rather than simply making the system louder. For tailored treatment alongside audio upgrades, schedule an audio installation appointment and discuss which panels need attention.
3. Replacing factory speakers
Factory speakers can limit clarity, detail, and dynamics, even when the stereo seems powerful on paper. A factory radio may advertise 200 watts, but that figure alone doesn’t explain its continuous output. Factory head units typically provide 15-20 watts RMS per channel, while factory radios commonly output signals between 0.5 and 2 volts. These ratings describe different parts of the system, so compare like with like before choosing replacements.
How do I choose aftermarket car speakers that fit my vehicle? Match the speaker’s physical dimensions and mounting depth to the factory location, then account for the vehicle’s connectors and available amplifier power. A compatible fit matters as much as sound character: an incompatible frame or connection can complicate installation.
Aftermarket speakers may use polypropylene cones, rubber surrounds, and silk dome tweeters to reproduce music with greater clarity and detail. Materials alone don’t guarantee a particular sound. Consider how you listen: clear vocals may call for a speaker with detailed midrange and treble, while music with strong percussion benefits from controlled response across the full range. Replacing only the front pair can improve the driver’s listening experience, while upgrading front and rear speakers can create a more consistent sound throughout the cabin.
Power matching deserves close attention. A replacement speaker connected to a factory head unit still receives power from that unit, so the speaker’s power-handling rating doesn’t mean the radio can drive it to its full potential. An external amplifier can supply more clean power, but the amplifier and speakers must suit one another. Don’t use the factory radio’s advertised peak wattage as the sole basis for choosing an amplifier.
A factory radio can also limit your control over the system. A digital signal processor, or DSP, can shape frequency response and adjust how sound reaches the listening positions. Many modern DSPs accept high-level inputs directly from factory speaker wires, allowing factory-radio integration without assuming the original unit has dedicated low-level outputs. This approach can preserve the factory head unit while adding finer system tuning.
Installation should preserve the vehicle’s fit and function. Careful speaker replacement accounts for mounting points, wiring polarity, door-panel clearance, and secure connections before the trim goes back into place. Incorrect polarity can make speakers work against each other, weakening bass and shifting the soundstage. Testing each channel after installation helps catch loose connections or imbalances before final reassembly.
For a coherent result, treat speaker choice, power, and DSP settings as connected decisions. A speaker upgrade can bring more detail, but tuning helps integrate it with the existing radio and other components. That balance is the difference between simply replacing hardware and building a system that plays cleanly across the music you enjoy.
4. Setting amplifier gains to avoid distortion
An amplifier’s gain control matches its input sensitivity to the signal from the stereo. It isn’t a volume control. Turning gain too high can overdrive the amplifier’s input and create distortion, even when the stereo’s volume hasn’t reached its maximum. Set gain for a clean signal, not the loudest possible output.
Power labels need careful interpretation. A stereo’s peak power rating of 50 watts per channel describes a brief maximum, while an outboard amplifier’s continuous RMS rating describes sustained power. These figures aren’t directly comparable. An external amplifier can provide more clean power than a car stereo, but its output must suit the speakers and system. More power alone won’t correct poor gain settings or a mismatched setup.
For an initial gain adjustment, set the receiver’s volume roughly three-quarters of the way to maximum. Then raise the amplifier gain gradually, listening for clean output rather than chasing extra loudness. If harshness or breakup appears, reduce the gain. A properly matched setting preserves headroom for music peaks, while excessive gain can make those peaks sound rough and tiring.
How do I identify and fix distortion, rattling, or weak bass in car speakers? Play familiar music at a moderate level, then isolate the symptom: lower the volume if the sound breaks up, and inspect speaker mounting and nearby trim if rattling continues. For weak bass, check speaker polarity and balance settings, then assess whether the system needs more clean amplification or better tuning.
Clipping occurs when an amplifier is pushed beyond the clean signal it can reproduce. The result may sound compressed, fuzzy, or sharp, especially during loud musical passages. Raising gain can make clipping happen sooner; it doesn’t create extra amplifier capacity. If distortion remains after you reduce gain, the source signal, speaker load, amplifier capability, or installation may need attention. Make one adjustment at a time so the cause stays clear.
An aftermarket amplifier can supply cleaner power to speakers, while a mono amplifier is designed to drive a subwoofer. Four-channel amplifiers can power front and rear speakers independently, and five-channel or multichannel models can power an entire system from one chassis. Choose the layout based on the components being powered, then set each channel’s gain to match its input.
For a factory-radio setup, an OEM-integration amplifier can work with the existing system instead of requiring a complete stereo replacement. Some models include signal-sensing turn-on circuits and compact designs for installation under seats or in hidden locations. An integrated DSP amplifier can combine amplification with signal adjustment, helping tailor output to the vehicle’s speakers and cabin.
5. Audio tuning and future system upgrades
Audio tuning brings the speakers, amplifier, and subwoofer together as a coherent system. Begin with a familiar recording, keep your listening position consistent, and adjust one setting at a time. If vocals sound buried beneath bass, reduce bass output or adjust the midrange before increasing overall volume. Small, deliberate changes make it easier to identify what actually improves the mix.
A digital signal processor (DSP) can refine equalization, crossover points, and timing. Equalization adjusts frequency balance, while crossovers direct different frequency ranges to suitable speakers. Timing adjustments help sounds from speakers at different distances arrive more cohesively. For example, a DSP can reduce an intrusive frequency without dulling the entire recording. The goal is an even, natural presentation, not dramatic settings that flatter one track.
Test the system with varied material: a vocal recording, a track with steady bass, and music with crisp percussion. Listen from the driver’s seat, then note whether voices stay centered and bass remains controlled. If one song sounds impressive but another becomes harsh, revisit the tuning instead of raising every level. Road conditions matter, too, since cabin noise can mask detail while driving.
Plan future upgrades around the system’s weakest link. If the factory radio lacks useful adjustment, a DSP may add control while retaining the existing head unit. If speakers need more clean power, an amplifier may be the logical next component. If bass is still lacking, a subwoofer can fill that gap. Add compatible components in stages, considering signal, power, space, and how each change affects the existing setup.
Should I install car audio upgrades myself or hire a professional installer? A straightforward speaker replacement may suit someone comfortable working with vehicle trim and wiring, but amplifier integration and DSP tuning require careful system matching. Professional installation is a practical choice when the work involves several components, factory-radio integration, or wiring routed through the vehicle.
After each upgrade, confirm that every speaker plays, the channels remain balanced, and no panel rattles during playback. Save a clean baseline before making DSP changes, then compare revised settings using the same recording and seat position. This step-by-step approach helps distinguish a genuine improvement from a change that simply makes the system louder.
The clearest upgrade path is deliberate: identify the sound problem, choose the component that addresses it, then tune the complete system. A well-planned sequence can leave room for later additions without prematurely replacing compatible equipment. Treat each adjustment as part of one system, and the result can sound more balanced across different music and listening levels.
PFM Performance Auto Group: Car Audio
PFM Performance Auto Group installs car audio upgrades for drivers seeking clearer, more balanced sound. If you’re considering speaker replacement, a subwoofer, or a broader system upgrade, professional installation can bring the components together and preserve a clean fit in your vehicle.
Consider car audio installation when you want help matching an upgrade to your listening priorities, or when wiring and system integration feel beyond your comfort level. Describing what sounds thin, harsh, or unbalanced helps shape the next step without replacing parts that still suit your setup.
Make your next upgrade part of a thoughtful plan
The right system should suit the way you use your vehicle, not just sound impressive during a brief demonstration. Before choosing your next step, consider what you want daily listening to feel like: more natural vocals, a fuller musical presence, or a setup that leaves room for future changes. That perspective keeps each decision purposeful and helps you improve car audio sound quality without treating every component as an automatic upgrade.
PFM Performance Auto Group can help shape a car audio plan around your priorities and vehicle. The business also offers auto window tinting, commercial window tinting, and home window tinting, bringing a considered approach to different spaces and needs.
Share what you enjoy listening to and what you’d like to change. A clear starting point makes it easier to discuss a system that suits you.
Your next drive can sound more like the music you love.
Frequently Asked Questions
Why Upgrade Your Car Audio System?
Upgrade your car audio system to make everyday listening more engaging and better suited to your preferences. A factory setup may lack the detail, connectivity, or balance you want, especially if you listen to different genres or stream music regularly. A focused change can address a specific frustration without replacing every component. Think about what you want to hear differently before choosing an upgrade.
What are the easiest ways to improve car audio sound quality?
Start with simple listening adjustments before replacing equipment. Center the balance and fade, then make small equalizer changes while playing a familiar track. If the sound improves at a moderate volume but becomes unpleasant when louder, avoid compensating with more bass or treble. Describing the problem clearly, such as muffled vocals or a sharp high end, helps identify which system change deserves attention.
Do I need an amplifier for better car audio sound?
No, an amplifier isn’t necessary for every system. If the existing stereo plays comfortably at your usual listening level, a separate amplifier may not address your main concern. It becomes relevant if the system lacks clean output at your preferred volume or you’re adding speakers that need more power. Match amplifier output to the speakers’ continuous power handling, rather than choosing based on peak ratings alone.
How can sound-deadening material reduce road noise and improve car audio?
Sound-deadening can limit vibration in vehicle panels and reduce some noise entering the cabin, making music easier to hear at a lower volume. Its value depends on the noise source: panel resonance calls for treating the vibrating panel, while tire noise may enter through other parts of the vehicle. It won’t make a moving car silent, but targeted treatment can make listening less fatiguing.
Can a head unit or lossless music source improve car audio sound quality?
Yes, a head unit with stronger audio processing can offer more useful system control, while a lossless source avoids some compression used by lossy formats. The difference depends on the recording, playback device, and rest of the audio system; a higher-quality file can’t correct speaker or tuning limitations. For drivers in Hillsborough County, choosing a source that works smoothly with the vehicle can be as important as the audio format.