
Car Light Flickering After LED Install: Causes and Fixes
Car light flickering after LED install can point to a mismatch between the bulb and your vehicle, a loose connection, or an issue with the LED’s driver. Replacing parts at random may add time and expense without revealing the cause.
It’s understandable to wonder whether the bulb, wiring, or vehicle electronics are to blame, especially when lights strobe or behave differently from one drive to the next. Start by narrowing down the cause rather than assuming every vehicle responds to an LED upgrade in the same way.
This guide explains how to distinguish common aftermarket bulb symptoms from issues that may involve the vehicle, which basic checks you can make safely, and when to stop DIY work. Follow a practical sequence before replacing components, and use the results to guide your next step.
Key Takeaways
- Use the flicker pattern, such as a startup flash or uneven output, to help narrow down what may be happening.
- For car light flickering after LED install, consider bulb seating, polarity, the LED driver, vehicle compatibility, and wiring before replacing parts.
- Follow a safe troubleshooting sequence: document when the flicker occurs, then make only checks allowed by your vehicle manual.
- Persistent flickering, partial illumination, repeated failures, or uncertain wiring are good reasons to stop DIY work.
- Professional LED installation can help address fit and compatibility concerns with careful component selection.
Why can a car light flicker after an LED install?
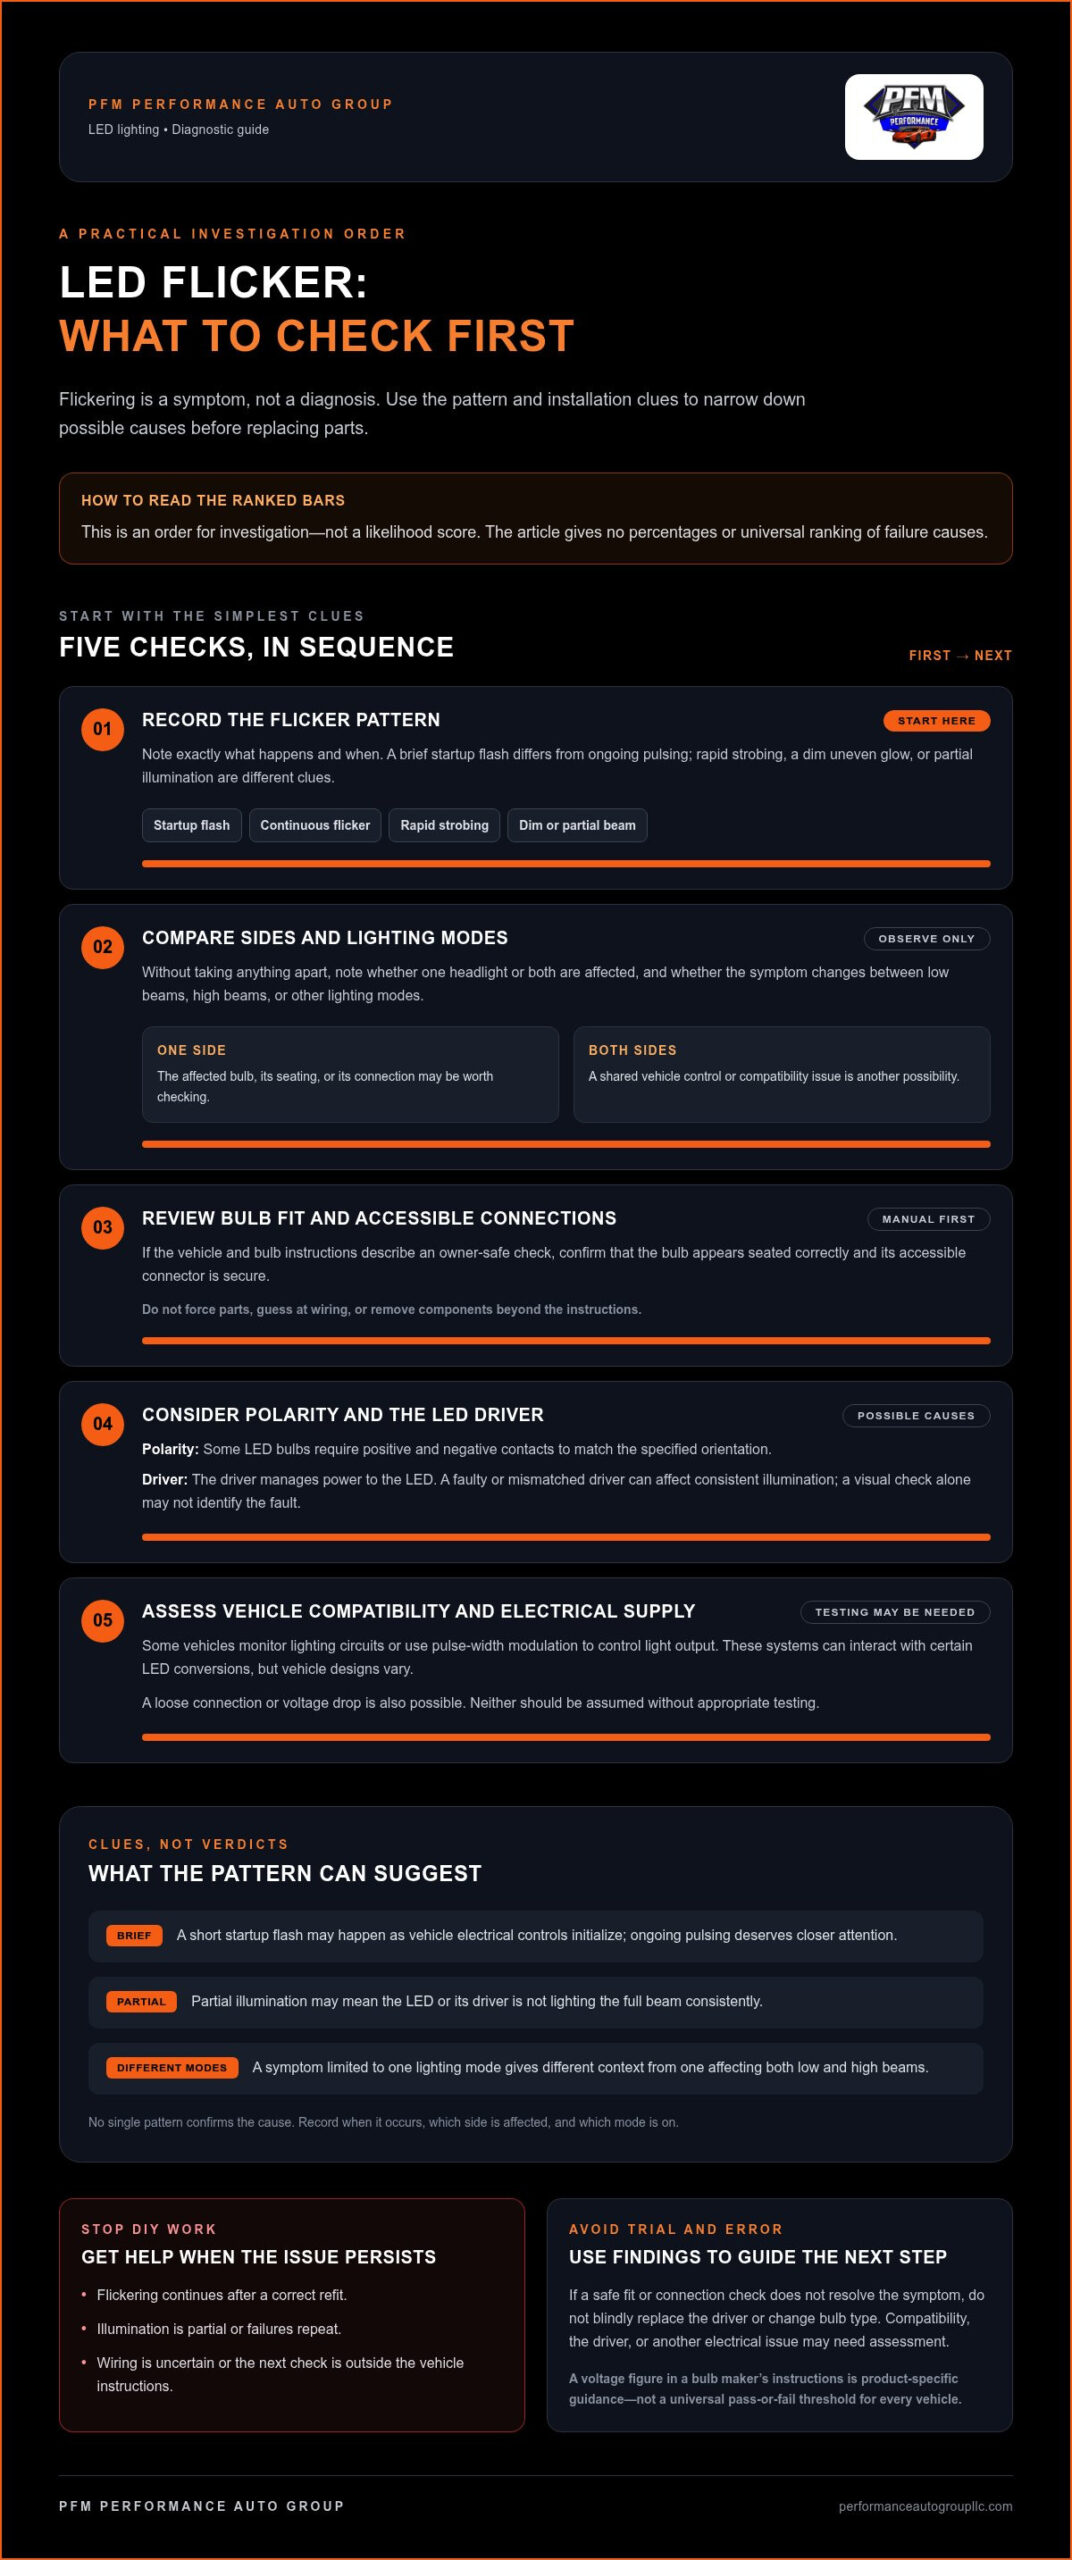
Flickering after an LED upgrade is a symptom, not a diagnosis. A light may pulse continuously, flash briefly when the vehicle starts, strobe rapidly, appear dim, or illuminate only part of the beam. Each pattern offers a clue, but none identifies the cause by itself. Note exactly what the light does and when it happens.
Flicker can originate in the bulb, driver, connection, or vehicle system. The driver manages power to the LED. The lighting mode matters, too: a symptom limited to high beams may point the investigation in a different direction from one affecting both low and high beams. The Automotive Lighting Systems overview explains common vehicle lighting functions.
What does the flicker pattern tell you?
Continuous flickering while driving differs from a brief flash at startup. A short flash may happen as the vehicle’s electrical controls initialize, while ongoing pulsing deserves closer attention. Rapid, repeating strobing also differs from a low, uneven glow. Partial illumination may mean the LED or its driver is not lighting the full beam consistently.
Compare sides and lighting modes without taking anything apart. If one headlight flickers while the other stays steady, the affected bulb, its seating, or its connection may be worth checking. If both sides behave alike, a shared vehicle control or compatibility issue is another possibility. Note whether the symptom changes between low beams, high beams, or other lighting modes.
Why can a new LED behave differently from a halogen bulb?
An LED bulb and its driver have different electrical requirements from a halogen bulb. Some vehicles monitor lighting and may interpret an LED’s lower power draw differently. Some systems also use pulse-width modulation, a method of controlling light output that can contribute to visible flicker with certain LED conversions. Vehicle designs vary, so neither behavior applies universally.
Timing alone doesn’t prove that a new LED is defective. The bulb may not be seated correctly, its driver may not suit the vehicle, or the vehicle’s electrical controls may interact with the conversion. A change between modes or sides adds context, but does not confirm a cause. Treat the pattern as a clue, not a verdict.
Record when the flicker occurs, which side is affected, and which lighting mode is on. These details help narrow the possibilities before parts are replaced. Comparing likely causes with safe checks can help distinguish a straightforward installation issue from a compatibility concern that calls for professional LED installation.
How to narrow down the cause of LED light flickering
Approach car light flickering after LED install as a compatibility and installation question before assuming a component has failed. Start with what changed: did the issue begin immediately after the upgrade, affect one side or both, or appear only in a particular lighting mode? These details organize the possibilities, but they can’t confirm a fault without appropriate inspection or testing.
The same LED bulb can behave differently across vehicle models because bulb design, electrical controls, and headlight connections vary. Use this cause map to guide the next check rather than jumping straight to a replacement:
- Bulb seating: An incompletely seated bulb may not align or connect as intended.
- Polarity: Some LED bulbs require the connector’s positive and negative contacts to match the specified orientation.
- LED driver: A faulty or mismatched driver can affect consistent illumination.
- Vehicle compatibility: Some vehicles monitor lighting circuits or control output with pulse-width modulation, which can affect certain LED conversions.
- Wiring or power supply: A loose connection or voltage drop is possible, but neither should be assumed without appropriate testing.
Check bulb fit, connection, and LED driver
Start with the installation instructions, not force or guesswork. If the vehicle and bulb manuals describe an owner-safe way to access the light, check whether the bulb appears properly seated and its accessible connector is secure. Don’t handle wiring or remove components beyond the instructions. The LED driver manages power to the bulb and may be faulty or incompatible, but a visual inspection alone may not establish which.
Consider vehicle electronics and power supply
Some vehicles monitor lighting circuits, while some use pulse-width modulation to control light output. Either can interact with certain LED conversions, but vehicle equipment differs. Battery or charging-system supply issues, including voltage drop, are also possible and call for suitable testing. A voltage figure in a particular bulb maker’s instructions is product-specific guidance, not a universal pass-or-fail threshold for every vehicle.
Keep the clues distinct. If reseating or correcting a connection doesn’t resolve the symptom, replacing a driver or changing bulb type shouldn’t be a blind next step. SAE engineering research offers broader context on LED headlamp performance, though it doesn’t replace vehicle-specific instructions or testing.
For persistent flicker or uncertain wiring, professional HID and LED installation can help address fit and component compatibility. Tampa-area drivers can book professional LED lighting installation at PFM Performance Auto Group.
Which fix fits the LED flicker symptom?
Match the next step to the pattern instead of replacing parts by trial and error. A one-sided flicker that began right after installation may justify a careful fit and connector review. Flickering that continues after a correct refit, affects both sides, or appears with partial illumination calls for more caution. Compatibility, the LED driver, or another electrical issue may need assessment. The symptom points toward a check, not a guaranteed fix.
| Symptom | Possible cause | Reasonable next check | When to stop |
|---|---|---|---|
| One light flickers after installation | Bulb seating or an accessible connector | With the vehicle off and components cool, review the fit only as the manuals permit. | Stop if access requires force, wiring changes, or removing unfamiliar components. |
| Both lights pulse or flash | Vehicle compatibility or lighting controls | Check the bulb instructions for application-specific compatibility guidance. | Stop if the issue persists or you can’t identify an approved next step. |
| One light remains dim or partly illuminated | Driver, bulb, or connection issue | Record which light and mode are affected; don’t assume a bulb swap will resolve it. | Stop if illumination is unreliable or the driver needs testing or replacement. |
| Flicker continues after a permitted refit | Mismatch, driver fault, or vehicle-side concern | Have the LED and installation assessed for the vehicle application. | Stop before adding components or altering wiring. |
When is a simple refit or connection check relevant?
A recent installation followed by flicker on one side makes fit and connection worth reviewing first, provided the vehicle and bulb instructions describe a safe owner check. Turn the vehicle off and let the components cool before inspection. Confirm only that accessible parts appear correctly seated. Don’t force a bulb, modify a connector, or splice wires. If the fit isn’t clear, leave it alone.
When might compatibility or an LED driver be the issue?
If flickering continues after a correct refit, the bulb may not suit the vehicle’s lighting system, or its driver may be faulty or mismatched. Use a vehicle-compatible bulb or component only when it is specified for that application. A decoder or load solution may help some setups, but selection depends on both vehicle and bulb. Don’t assume a resistor, decoder, or replacement bulb will solve every case.
Avoid improvised wiring or bypassing vehicle safeguards as a quick fix. These steps can turn a lighting symptom into a more involved electrical concern without establishing the original cause. If a proposed remedy requires direct battery powering, connector modification, or work beyond the vehicle manual, stop and seek qualified help. For drivers facing car light flickering after LED install, professional HID and LED installation can help address fit and component selection for the vehicle application.
How to troubleshoot flickering car LEDs safely, step by step
Take a measured approach before touching the lighting system. If car light flickering after LED install is the concern, careful observations can help you describe the problem without risking damage or treating a warning as a diagnosis. Stick to checks permitted by your vehicle manual and the LED manufacturer’s instructions.
Start with observations before touching the lighting system
Record what happens and when. Note which lamp is affected, whether the flicker occurs at startup or while driving, and which lighting mode is selected. Watch for a dashboard lighting warning, too, but remember that a warning indicates a reported condition, not necessarily its cause. Compare your notes with both sets of instructions before considering any hands-on check.
- Document the symptom. Write down the affected side, operating mode, and whether the flicker is continuous, intermittent, or limited to startup. Note if the light dims or only part of it illuminates.
- Observe the vehicle’s response. Look for a lighting warning on the dashboard and record when it appears. Don’t reset warnings or assume they identify a failed bulb.
- Review the instructions. Check the vehicle manual and LED manufacturer guidance for approved inspection steps, bulb orientation, and application-specific cautions.
- Make the vehicle safe before inspection. Turn it off and allow the lighting components to cool. Follow the manual’s directions for access, and don’t reach into areas it identifies as unsafe.
- Limit checks to accessible connections. If instructions permit, look for a connector that appears loose or a bulb that seems improperly seated. Don’t force parts, alter connectors, splice wires, or remove unfamiliar components.
- Stop at signs of damage or worsening symptoms. Avoid further handling if wiring, a harness, fuse area, or bulb housing appears damaged, if a component is hot, or if the flickering becomes more pronounced.
Know when DIY checks should end
Owner checks should remain visual and low risk. Don’t probe live wiring or perform battery-direct tests unless you have the appropriate expertise and equipment. A connector that won’t seat easily, visible damage, or a worsening symptom is a clear stopping point, not a reason to push harder or improvise a workaround. Keep your notes to share with a qualified lighting installer.
If you’d rather avoid handling the lighting components, PFM Performance Auto Group provides professional LED lighting installation at its workshop in Hillsborough County. Tampa-area drivers can book an appointment for lighting installation.
When to book professional LED lighting installation in Tampa
Stop DIY work if flickering persists after checks allowed by your vehicle manual, a light is only partly illuminated, bulbs fail repeatedly, or you’re unsure about the wiring. These symptoms don’t point to one certain cause, but they make trial-and-error changes a poor next step. Lighting components need to fit the vehicle and work appropriately with its electrical system, so continued guesswork may create more uncertainty.
- Persistent flicker: The light continues to pulse after a permitted basic check.
- Partial illumination: A lamp is dim or only part of the light appears to work.
- Repeated failures: Replacement bulbs show similar problems.
- Uncertain wiring: Access or connections appear damaged, unfamiliar, or beyond your experience.
Professional installation focuses on correct fit and selecting lighting components appropriate for the vehicle. That’s a more considered path than repeatedly replacing bulbs or adding electrical components without knowing whether they suit the application. If the light’s operation is unreliable, avoid further handling and arrange professional help.
What information helps prepare for a lighting appointment?
A few details can make it easier to discuss the installation and the symptom. Share the vehicle’s year, make, and model, along with the type of LED bulb already installed, if you know it. Describe when flickering occurs, which lighting mode is on, and whether one light or both are affected. Bring any bulb packaging or installation details you have.
- Vehicle year, make, and model
- LED bulb type or available product details
- Which light is affected and when the symptom occurs
- Any changes you’ve noticed since the LED installation
Choose a careful installation, not another guess
Professional lighting installation gives attention to how the bulb fits and how the selected components interface with the vehicle. It avoids treating every car as though it uses the same lighting setup. The aim is careful installation and appropriate component selection, not a promise that one particular part will resolve every flicker.
PFM Performance Auto Group is a locally owned Hillsborough County shop serving Tampa, with professional HID and LED lighting installation at its workshop. The business has operated since 2004. If you’re dealing with car light flickering after LED install, share what you’ve observed when arranging an appointment.
Make your next lighting step a considered one
Unresolved car light flickering after LED install doesn’t have to lead to another round of guesswork. Treat the symptom as useful information: a clear description of when it happens and which lamp is affected gives your next installation conversation a practical starting point. From there, the focus can shift to choosing lighting components that suit your vehicle and fitting them with care.
PFM Performance Auto Group offers HID and LED lighting installation in Tampa. A considered installation can help you move forward with a clearer plan for your vehicle, rather than relying on trial and error.
Take the next step by booking professional LED lighting installation at PFM Performance Auto Group.
Frequently Asked Questions
Can LED headlights flicker because the bulb is incompatible with my car?
Yes, incompatibility is one possible cause, but it isn’t the only one. A bulb that suits one vehicle may interact differently with another vehicle’s lighting controls, connector, or LED driver. If you’re dealing with car light flickering after LED install, note whether one or both lamps are affected and when it happens, then compare the bulb’s application details with your vehicle specifications. Don’t assume a decoder or replacement bulb will resolve every case.
Does a flickering LED headlight drain the car battery?
Flickering by itself doesn’t establish that the battery is being drained. The light’s behavior could relate to the bulb, driver, connection, vehicle controls, or electrical supply, so it isn’t a reliable battery test. If starting the vehicle has become difficult or other electrical symptoms appear, arrange appropriate testing instead of drawing a conclusion from the headlight alone. Avoid prolonged use of unreliable lights, particularly when visibility is poor.
Can cold weather make newly installed LED headlights flicker?
Temperature can affect electrical components, but cold weather alone doesn’t identify why a headlight flickers. If the symptom began after an LED upgrade, review the installation and application details rather than assuming the weather is responsible. Record whether the flicker occurs at startup, changes as the vehicle warms, or returns during a later drive. These observations can help describe a recurring issue when compared with the vehicle and bulb instructions.
Is a CANbus decoder always needed for LED headlight bulbs?
No, a decoder isn’t automatically required. Whether a decoder or another compatible component is appropriate depends on the vehicle’s lighting system and the specific bulb. Adding a component without application-specific guidance may create another issue instead of addressing the original one. Hillsborough County drivers can choose professional HID and LED installation at PFM Performance Auto Group. Don’t experiment with wiring if flickering continues or the correct fitment is unclear.
Can I drive at night with one flickering headlight?
A flickering headlight can make your visibility inconsistent and make it harder for other drivers to judge your vehicle. Avoid relying on it for night driving while its operation is unreliable, even if it seems steady for a short time. A temporary pause in the flicker doesn’t confirm that the problem is resolved. Before driving at night, consult an authoritative source for applicable road requirements and arrange a safe solution for the lighting issue.
Why do LED turn signals flash rapidly after a bulb replacement?
Rapid turn-signal flashing, often called hyper-flashing, can happen when a vehicle detects a different electrical load after a bulb change. The suitable correction depends on the vehicle’s circuit and replacement bulb, so compare the bulb’s application guidance with the vehicle instructions. A compatible bulb or vehicle-appropriate component may be needed, but don’t add resistors or alter wiring by guesswork. Incorrect installation can create heat or electrical problems.